Are you a developer new to the Arduino IDE software? Here’s a quick guide to help you get started with writing code for your Arduino boards.
Step 1: Install the Arduino IDE software
Download and install the latest version of the Arduino IDE software from the official Arduino website. The software is available for Windows, Mac, and Linux.
https://support.arduino.cc/hc/en-us/articles/360019833020-Download-and-install-Arduino-IDE
Step 2: Connect your Arduino board
Connect your Arduino board to your computer using a USB cable. You should see a green LED light up on the board.
Step 3: Set up your board in the Arduino IDE
In the Arduino IDE software, go to Tools > Board and select the appropriate board type from the list. For example, if you are using an Arduino UNO board, select “Arduino Uno”.
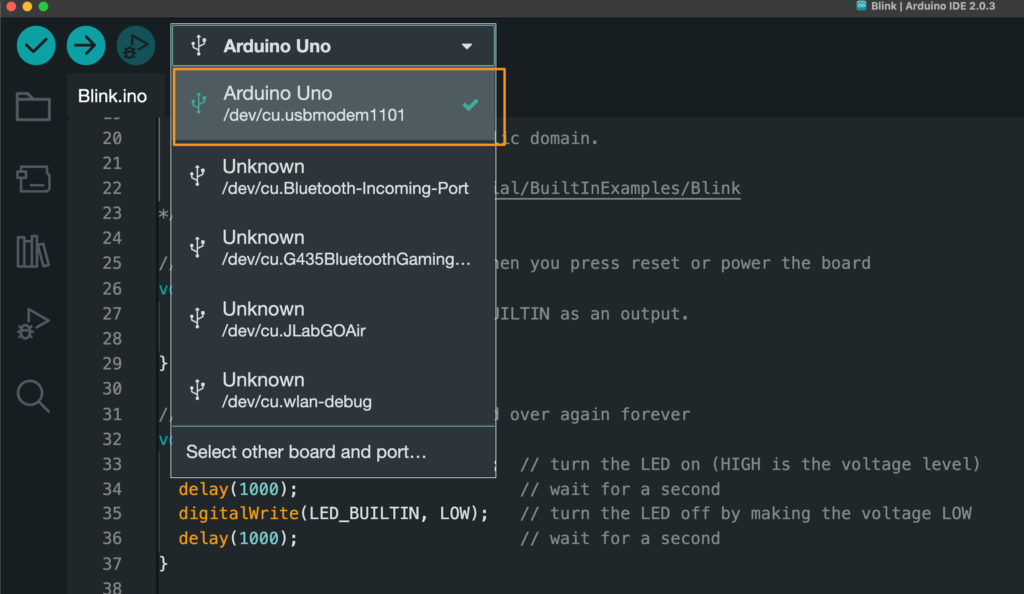
Step 4: Select the serial port
Go to Tools > Port and select the serial port that your Arduino board is connected to. On Windows, it will be something like “COM3” or “COM4”. On Mac or Linux, it will be something like “/dev/cu.usbmodemXXXX”.
Step 5: Using a basic example program/code.
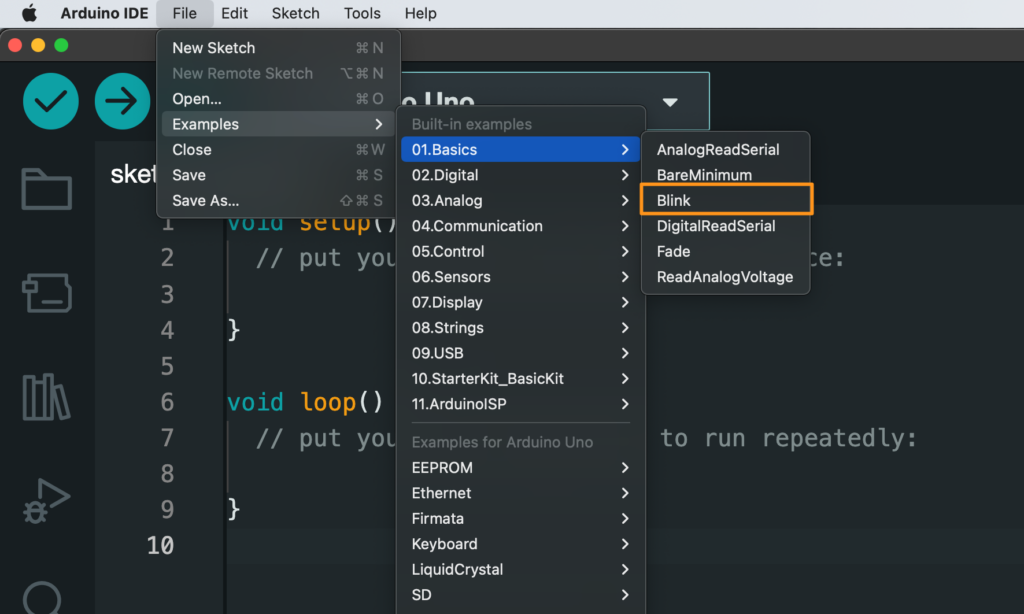
The Arduino IDE comes with some built-in example programs that are designed to help beginners get started quickly. One of the most well-known examples is the “Blink” program. This program is very simple and allows an LED connected to the Arduino board to blink at a time interval of 1 second.
To access the Blink example program, open the Arduino IDE and click on the “File > Examples > Basics > Blink” menu option.
/*
  Blink

  Turns an LED on for one second, then off for one second, repeatedly.

  Most Arduinos have an on-board LED you can control. On the UNO, MEGA and ZERO
  it is attached to digital pin 13, on MKR1000 on pin 6. LED_BUILTIN is set to
  the correct LED pin independent of which board is used.
  If you want to know what pin the on-board LED is connected to on your Arduino
  model, check the Technical Specs of your board at:
  https://www.arduino.cc/en/Main/Products

  modified 8 May 2014
  by Scott Fitzgerald
  modified 2 Sep 2016
  by Arturo Guadalupi
  modified 8 Sep 2016
  by Colby Newman

  This example code is in the public domain.

  https://www.arduino.cc/en/Tutorial/BuiltInExamples/Blink
*/

// the setup function runs once when you press reset or power the board
void setup() {
  // initialize digital pin LED_BUILTIN as an output.
  pinMode(LED_BUILTIN, OUTPUT);
}

// the loop function runs over and over again forever
void loop() {
  digitalWrite(LED_BUILTIN, HIGH);  // turn the LED on (HIGH is the voltage level)
  delay(1000);                      // wait for a second
  digitalWrite(LED_BUILTIN, LOW);   // turn the LED off by making the voltage LOW
  delay(1000);                      // wait for a second
}
Step 6: Upload your code
Once you have written your code, click the “Upload” button in the Arduino IDE software. This will compile your code and upload it to your Arduino board. You should see a progress bar at the bottom of the window, and when the upload is complete, you should see a message saying “Done uploading”.
Step 7: Reviewing the results of the practice
At this point, you will notice that the LED next to pin 13 on the Arduino Uno board is blinking! Hey, it’s a success!
In conclusion, this quick guide should help you get started with using the Arduino IDE software for developing code for your Arduino boards. There are many more features and options available in the software, but these steps should help you get started with your first project. Happy coding!
English Version
Are you a developer new to the Arduino IDE software? Here’s a quick guide to help you get started with writing code for your Arduino boards.
Step 1: Install the Arduino IDE software
Download and install the latest version of the Arduino IDE software from the official Arduino website. The software is available for Windows, Mac, and Linux.
https://support.arduino.cc/hc/en-us/articles/360019833020-Download-and-install-Arduino-IDE
Step 2: Connect your Arduino board
Connect your Arduino board to your computer using a USB cable. You should see a green LED light up on the board.
Step 3: Set up your board in the Arduino IDE
In the Arduino IDE software, go to Tools > Board and select the appropriate board type from the list. For example, if you are using an Arduino UNO board, select “Arduino Uno”.
Step 4: Select the serial port
Go to Tools > Port and select the serial port that your Arduino board is connected to. On Windows, it will be something like “COM3” or “COM4”. On Mac or Linux, it will be something like “/dev/cu.usbmodemXXXX”.
Step 5: Using a basic example program/code.
The Arduino IDE comes with some built-in example programs that are designed to help beginners get started quickly. One of the most well-known examples is the “Blink” program. This program is very simple and allows an LED connected to the Arduino board to blink at a time interval of 1 second.
To access the Blink example program, open the Arduino IDE and click on the “File > Examples > Basics > Blink” menu option.
/*
  Blink

  Turns an LED on for one second, then off for one second, repeatedly.

  Most Arduinos have an on-board LED you can control. On the UNO, MEGA and ZERO
  it is attached to digital pin 13, on MKR1000 on pin 6. LED_BUILTIN is set to
  the correct LED pin independent of which board is used.
  If you want to know what pin the on-board LED is connected to on your Arduino
  model, check the Technical Specs of your board at:
  https://www.arduino.cc/en/Main/Products

  modified 8 May 2014
  by Scott Fitzgerald
  modified 2 Sep 2016
  by Arturo Guadalupi
  modified 8 Sep 2016
  by Colby Newman

  This example code is in the public domain.

  https://www.arduino.cc/en/Tutorial/BuiltInExamples/Blink
*/

// the setup function runs once when you press reset or power the board
void setup() {
  // initialize digital pin LED_BUILTIN as an output.
  pinMode(LED_BUILTIN, OUTPUT);
}

// the loop function runs over and over again forever
void loop() {
  digitalWrite(LED_BUILTIN, HIGH);  // turn the LED on (HIGH is the voltage level)
  delay(1000);                      // wait for a second
  digitalWrite(LED_BUILTIN, LOW);   // turn the LED off by making the voltage LOW
  delay(1000);                      // wait for a second
}
Step 6: Upload your code
Once you have written your code, click the “Upload” button in the Arduino IDE software. This will compile your code and upload it to your Arduino board. You should see a progress bar at the bottom of the window, and when the upload is complete, you should see a message saying “Done uploading”.
Step 7: Reviewing the results of the practice
At this point, you will notice that the LED next to pin 13 on the Arduino Uno board is blinking! Hey, it’s a success!
In conclusion, this quick guide should help you get started with using the Arduino IDE software for developing code for your Arduino boards. There are many more features and options available in the software, but these steps should help you get started with your first project. Happy coding!
日本語版
Arduino IDEソフトウェアを初めて使う開発者ですか?Arduinoボード用のコードを書き始めるためのクイックガイドをご紹介します。
ステップ1:Arduino IDEソフトウェアのインストール
Arduino公式ウェブサイトから最新バージョンのArduino IDEソフトウェアをダウンロードしてインストールします。このソフトウェアはWindows、Mac、Linuxに対応しています。
https://support.arduino.cc/hc/en-us/articles/360019833020-Download-and-install-Arduino-IDE
ステップ2:Arduinoボードの接続
USBケーブルを使用してArduinoボードをコンピュータに接続します。ボード上の緑色のLEDが点灯するはずです。
ステップ3:Arduino IDEでボードを設定する
Arduino IDEソフトウェアで、ツール > ボードに移動し、リストから適切なボードタイプを選択します。例えば、Arduino UNOボードを使用している場合は「Arduino Uno」を選択します。
ステップ4:シリアルポートの選択
ツール > ポートに移動し、Arduinoボードが接続されているシリアルポートを選択します。Windowsでは「COM3」や「COM4」のような形式になります。MacまたはLinuxでは「/dev/cu.usbmodemXXXX」のような形式になります。
ステップ5:基本的なサンプルプログラム/コードの使用
Arduino IDEには、初心者がすぐに始められるように設計されたいくつかの組み込みサンプルプログラムが付属しています。最もよく知られている例の一つが「Blink」プログラムです。このプログラムは非常にシンプルで、Arduinoボードに接続されたLEDを1秒間隔で点滅させることができます。
Blinkサンプルプログラムにアクセスするには、Arduino IDEを開き、「ファイル > スケッチ例 > 01.Basics > Blink」メニューオプションをクリックします。
/*
  Blink

  Turns an LED on for one second, then off for one second, repeatedly.

  Most Arduinos have an on-board LED you can control. On the UNO, MEGA and ZERO
  it is attached to digital pin 13, on MKR1000 on pin 6. LED_BUILTIN is set to
  the correct LED pin independent of which board is used.
  If you want to know what pin the on-board LED is connected to on your Arduino
  model, check the Technical Specs of your board at:
  https://www.arduino.cc/en/Main/Products

  modified 8 May 2014
  by Scott Fitzgerald
  modified 2 Sep 2016
  by Arturo Guadalupi
  modified 8 Sep 2016
  by Colby Newman

  This example code is in the public domain.

  https://www.arduino.cc/en/Tutorial/BuiltInExamples/Blink
*/

// the setup function runs once when you press reset or power the board
void setup() {
  // initialize digital pin LED_BUILTIN as an output.
  pinMode(LED_BUILTIN, OUTPUT);
}

// the loop function runs over and over again forever
void loop() {
  digitalWrite(LED_BUILTIN, HIGH);  // turn the LED on (HIGH is the voltage level)
  delay(1000);                      // wait for a second
  digitalWrite(LED_BUILTIN, LOW);   // turn the LED off by making the voltage LOW
  delay(1000);                      // wait for a second
}
ステップ6:コードのアップロード
コードを書き終えたら、Arduino IDEソフトウェアの「アップロード」ボタンをクリックします。これによりコードがコンパイルされ、Arduinoボードにアップロードされます。ウィンドウの下部にプログレスバーが表示され、アップロードが完了すると「Done uploading」というメッセージが表示されます。
ステップ7:実践結果の確認
この時点で、Arduino Unoボードのピン13の横にあるLEDが点滅していることに気づくでしょう!成功です!
以上、このクイックガイドがArduinoボード用のコード開発にArduino IDEソフトウェアを使い始めるための助けになれば幸いです。ソフトウェアにはさらに多くの機能やオプションがありますが、これらのステップで最初のプロジェクトを始めることができるでしょう。楽しいコーディングを!