
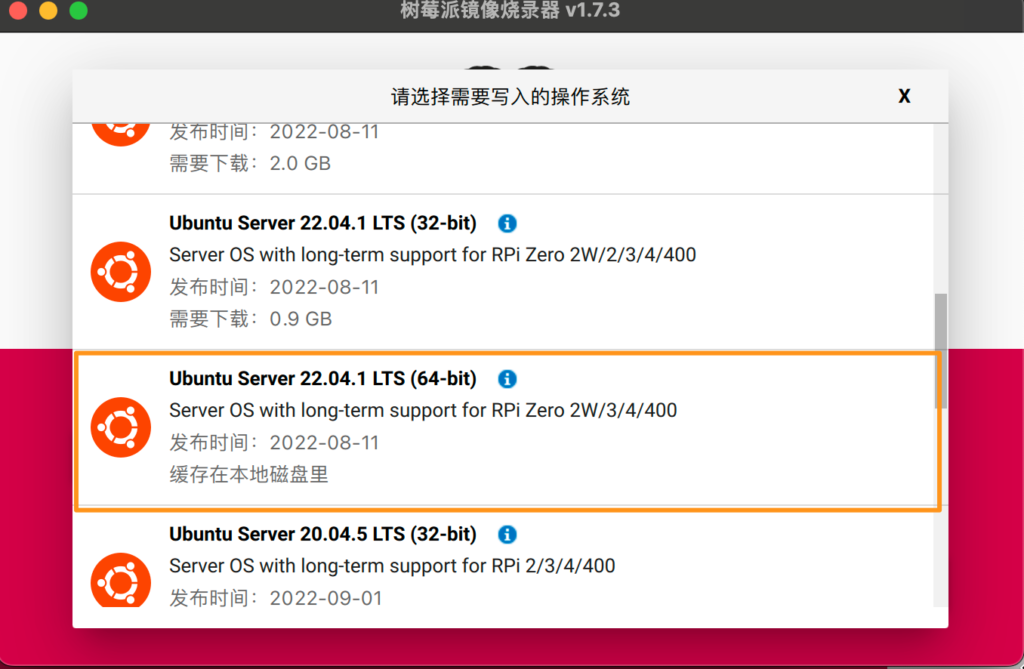
This guide will teach you how to quickly make an Ubuntu Operation System SD card, boot it on Raspberry Pi 4, and set up the iDempiere server.
Preparation
- A microSD card ( 32GB to 128GB)
- A computer with a microSD card drive
- A Raspberry Pi 4 B ( 4G or 8G Ram)
- A USB-C power cable
- A Wi-Fi network or an ethernet cable with an internet connection
Optionally:
- A monitor with an HDMI interface
- An HDMI cable for the Pi 2 & 3 and a micro HDMI cable for the Pi 4
- A USB keyboard
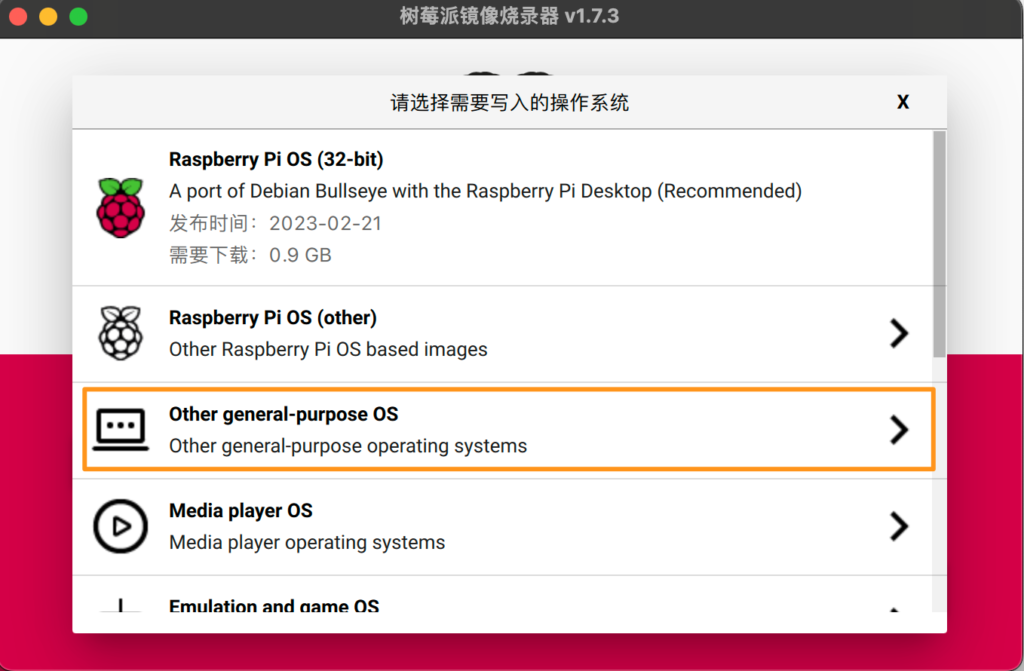
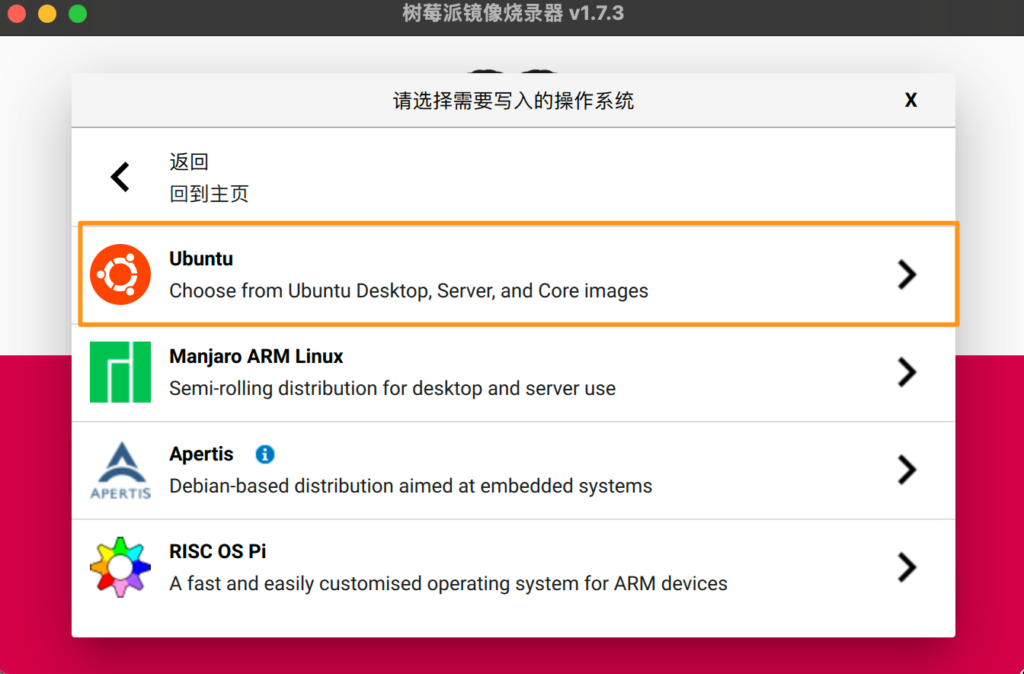
Prepare the SD Card
Download Raspberry Imager from the raspberry pi official website.
Windows:
https://downloads.raspberrypi.org/imager/imager_latest.exe
MacOS:
https://downloads.raspberrypi.org/imager/imager_latest.dmg
Ubuntu:
https://downloads.raspberrypi.org/imager/imager_latest_amd64.deb
I use MacOS to demonstrate.

The following action is very important, to set your Linux account password
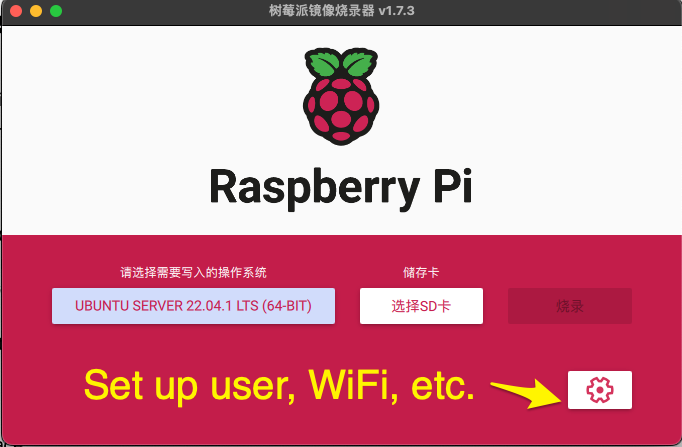
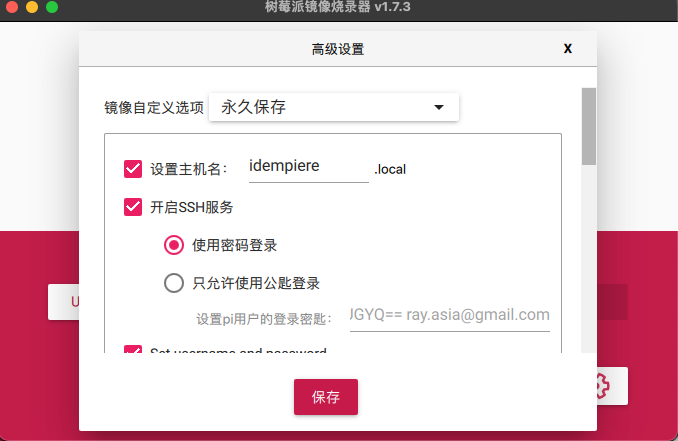
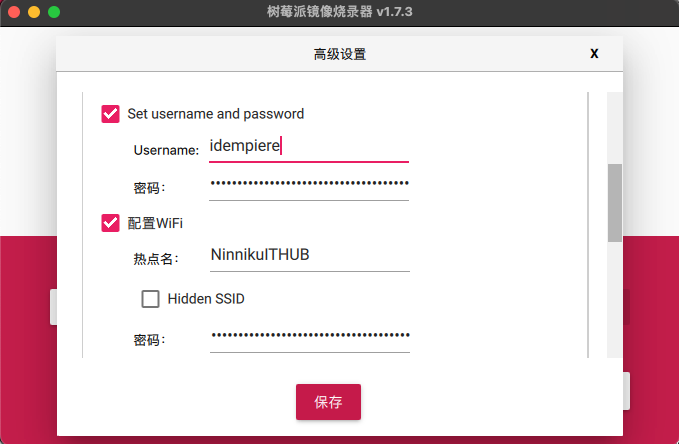
Once it’s set, you can grill it
Connect to Raspberry Pi 4
After the Raspberry Pi has been booted, you can connect to it using Secure Shell (SSH).
If you don’t know the IP address of your Raspberry Pi, you can use a network scanner tool like “Angry IP Scanner” or “Advanced IP Scanner” to scan your network and find the IP address of your Raspberry Pi. Once you have the IP address, you can use an SSH client like PuTTY (Windows OS Only) to connect to your Raspberry Pi. Alternatively, you can connect your Raspberry Pi to a monitor and keyboard and use the command “ifconfig” in the terminal to display its IP address.
#Install JDK

sudo apt install openjdk-11-jdk-headless

#Instal PostgresSQL Server

sudo apt install postgresql
Change password to user postgres
sudo su postgres
psql
alter user postgres password 'postgres_password'
Prepare iDempiere Installer
You can build an installer from the iDempiere source code. Or directly download it from the official website.
wget https://sourceforge.net/projects/idempiere/files/v9/daily-server/idempiereServer9Daily.gtk.linux.x86_64.zip

#Extract file
unzip idempiereServer9Daily.gtk.linux.x86_64.zip
# initial configuration properties
cd idempiere.gtk.linux.x86_64/idempiere-server
sh console-setup-alt.sh
# Refer to the prompt question to enter the parameters, if you don't know, just keep pressing the ENTER key
# Change to utils directory
cd utils
# Import seed into database
RUN_ImportIdempiere.sh
#
RUN_SyncDB.shTuning iDempiere ERP Performance
To configure iDempiere memory settings, you can follow these steps:
- Locate the
myEnvironment.shfile in the iDempiere installation directory’s utils directory. - Open the file in a text editor.
- Search for the
JAVA_OPTSvariable. - Set the desired memory settings using the
-Xms(initial heap size) and-Xmx(maximum heap size) flags. For example:makefileCopy codeJAVA_OPTS="-Xms2048m -Xmx2048m"This would set the initial heap size to 2048 MB and the maximum heap size to 2048 MB. - Save the changes to the
myEnvironment.shfile. - Restart the iDempiere server for the changes to take effect.
Note that the optimal memory settings may vary depending on the size of your iDempiere database and the number of users accessing the system. It’s recommended to monitor system performance and adjust the memory settings as necessary.
#Change to the idempiere working folder to start the server.
idempeire-server.sh &
Please refer to the next article for the stoping idempiere server.
English Version
This guide will teach you how to quickly make an Ubuntu Operation System SD card, boot it on Raspberry Pi 4, and set up the iDempiere server.
Preparation
- A microSD card ( 32GB to 128GB)
- A computer with a microSD card drive
- A Raspberry Pi 4 B ( 4G or 8G Ram)
- A USB-C power cable
- A Wi-Fi network or an ethernet cable with an internet connection
Optionally:
- A monitor with an HDMI interface
- An HDMI cable for the Pi 2 & 3 and a micro HDMI cable for the Pi 4
- A USB keyboard
Prepare the SD Card
Download Raspberry Imager from the raspberry pi official website.
Windows:
https://downloads.raspberrypi.org/imager/imager_latest.exe
MacOS:
https://downloads.raspberrypi.org/imager/imager_latest.dmg
Ubuntu:
https://downloads.raspberrypi.org/imager/imager_latest_amd64.deb
I use MacOS to demonstrate.
The following action is very important, to set your Linux account password
Once it’s set, you can grill it
Connect to Raspberry Pi 4
After the Raspberry Pi has been booted, you can connect to it using Secure Shell (SSH).
If you don’t know the IP address of your Raspberry Pi, you can use a network scanner tool like “Angry IP Scanner” or “Advanced IP Scanner” to scan your network and find the IP address of your Raspberry Pi. Once you have the IP address, you can use an SSH client like PuTTY (Windows OS Only) to connect to your Raspberry Pi. Alternatively, you can connect your Raspberry Pi to a monitor and keyboard and use the command “ifconfig” in the terminal to display its IP address.
#Install JDK

sudo apt install openjdk-11-jdk-headless

#Instal PostgresSQL Server

sudo apt install postgresql
Change password to user postgres
sudo su postgres
psql
alter user postgres password 'postgres_password'
Prepare iDempiere Installer
You can build an installer from the iDempiere source code. Or directly download it from the official website.
wget https://sourceforge.net/projects/idempiere/files/v9/daily-server/idempiereServer9Daily.gtk.linux.x86_64.zip

#Extract file
unzip idempiereServer9Daily.gtk.linux.x86_64.zip
# initial configuration properties
cd idempiere.gtk.linux.x86_64/idempiere-server
sh console-setup-alt.sh
# Refer to the prompt question to enter the parameters, if you don't know, just keep pressing the ENTER key
# Change to utils directory
cd utils
# Import seed into database
RUN_ImportIdempiere.sh
#
RUN_SyncDB.shTuning iDempiere ERP Performance
To configure iDempiere memory settings, you can follow these steps:
- Locate the
myEnvironment.shfile in the iDempiere installation directory’s utils directory. - Open the file in a text editor.
- Search for the
JAVA_OPTSvariable. - Set the desired memory settings using the
-Xms(initial heap size) and-Xmx(maximum heap size) flags. For example:makefileCopy codeJAVA_OPTS="-Xms2048m -Xmx2048m"This would set the initial heap size to 2048 MB and the maximum heap size to 2048 MB. - Save the changes to the
myEnvironment.shfile. - Restart the iDempiere server for the changes to take effect.
Note that the optimal memory settings may vary depending on the size of your iDempiere database and the number of users accessing the system. It’s recommended to monitor system performance and adjust the memory settings as necessary.
#Change to the idempiere working folder to start the server.
idempeire-server.sh &
Please refer to the next article for the stoping idempiere server.
日本語版
このガイドでは、Ubuntu OSのSDカードを素早く作成し、Raspberry Pi 4で起動して、iDempiereサーバーをセットアップする方法を説明します。
準備するもの
- microSDカード(32GB〜128GB)
- microSDカードドライブ付きのコンピュータ
- Raspberry Pi 4 B(4Gまたは8G RAM)
- USB-C電源ケーブル
- Wi-Fiネットワークまたはインターネット接続のあるイーサネットケーブル
オプション:
- HDMIインターフェース付きモニター
- Pi 2・3用のHDMIケーブル、およびPi 4用のmicro HDMIケーブル
- USBキーボード
SDカードの準備
Raspberry Pi公式ウェブサイトからRaspberry Imagerをダウンロードします。
Windows:
https://downloads.raspberrypi.org/imager/imager_latest.exe
MacOS:
https://downloads.raspberrypi.org/imager/imager_latest.dmg
Ubuntu:
https://downloads.raspberrypi.org/imager/imager_latest_amd64.deb
ここではMacOSを使用してデモンストレーションを行います。
次の操作は非常に重要です。Linuxアカウントのパスワードを設定します
設定が完了したら、書き込みを開始できます
Raspberry Pi 4に接続する
Raspberry Piが起動したら、Secure Shell(SSH)を使用して接続できます。
Raspberry PiのIPアドレスがわからない場合は、「Angry IP Scanner」や「Advanced IP Scanner」などのネットワークスキャナーツールを使用してネットワークをスキャンし、Raspberry PiのIPアドレスを見つけることができます。IPアドレスがわかったら、PuTTY(Windows OSのみ)などのSSHクライアントを使用してRaspberry Piに接続できます。また、Raspberry Piをモニターとキーボードに接続し、ターミナルで「ifconfig」コマンドを使用してIPアドレスを表示することもできます。
#Install JDK

sudo apt install openjdk-11-jdk-headless

#Instal PostgresSQL Server

sudo apt install postgresql
postgresユーザーのパスワードを変更する
sudo su postgres
psql
alter user postgres password 'postgres_password'
iDempiereインストーラーの準備
iDempiereのソースコードからインストーラーをビルドすることができます。または、公式ウェブサイトから直接ダウンロードすることもできます。
wget https://sourceforge.net/projects/idempiere/files/v9/daily-server/idempiereServer9Daily.gtk.linux.x86_64.zip

#Extract file
unzip idempiereServer9Daily.gtk.linux.x86_64.zip
# initial configuration properties
cd idempiere.gtk.linux.x86_64/idempiere-server
sh console-setup-alt.sh
# Refer to the prompt question to enter the parameters, if you don't know, just keep pressing the ENTER key
# Change to utils directory
cd utils
# Import seed into database
RUN_ImportIdempiere.sh
#
RUN_SyncDB.shiDempiere ERPのパフォーマンスチューニング
iDempiereのメモリ設定を構成するには、以下の手順に従ってください:
- iDempiereインストールディレクトリのutilsディレクトリにある
myEnvironment.shファイルを見つけます。 - テキストエディタでファイルを開きます。
JAVA_OPTS変数を検索します。-Xms(初期ヒープサイズ)と-Xmx(最大ヒープサイズ)フラグを使用して、希望するメモリ設定を行います。例:JAVA_OPTS="-Xms2048m -Xmx2048m"これにより、初期ヒープサイズが2048 MB、最大ヒープサイズが2048 MBに設定されます。myEnvironment.shファイルへの変更を保存します。- 変更を有効にするために、iDempiereサーバーを再起動します。
最適なメモリ設定は、iDempiereデータベースのサイズやシステムにアクセスするユーザー数によって異なる場合があります。システムのパフォーマンスを監視し、必要に応じてメモリ設定を調整することをお勧めします。
#Change to the idempiere working folder to start the server.
idempeire-server.sh &
iDempiereサーバーの停止方法については、次の記事を参照してください。