Before installing WordPress on Raspberry Pi, you may want to know about its advantages and disadvantages. You can refer to the following post.
This guide will teach you how to quickly make an Ubuntu Operation System SD card, boot it on Raspberry Pi 4, and set up the WordPress server.
Preparation
- A microSD card ( 32GB to 128GB)
- A computer with a microSD card drive
- A Raspberry Pi 4 B ( 4G or 8G Ram)
- A USB-C power cable
- A Wi-Fi network or an ethernet cable with an internet connection
Optionally:
- A monitor with an HDMI interface
- An HDMI cable for the Pi 2 & 3 and a micro HDMI cable for the Pi 4
- A USB keyboard
Prepare the SD Card
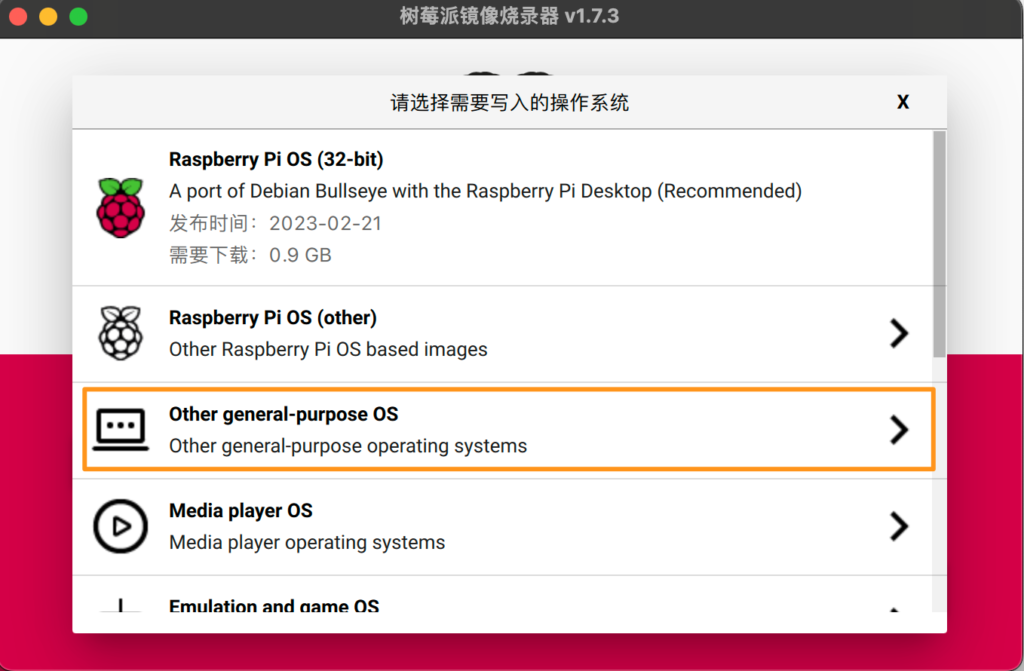
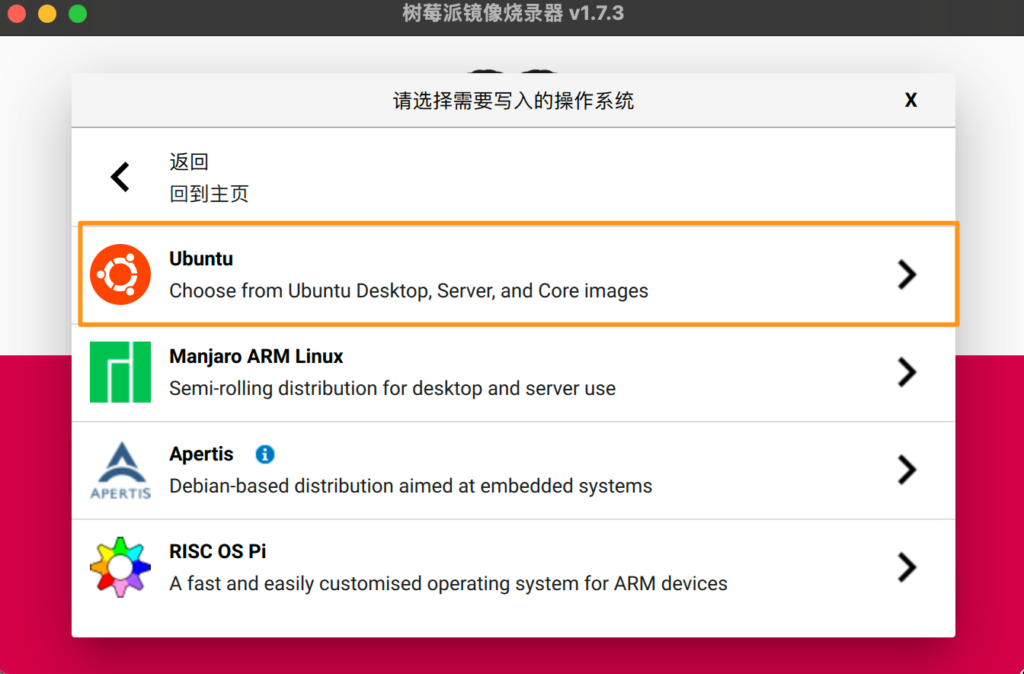
Download Raspberry Imager from the raspberry pi official website.
Windows:
https://downloads.raspberrypi.org/imager/imager_latest.exe
MacOS:
https://downloads.raspberrypi.org/imager/imager_latest.dmg
Ubuntu:
https://downloads.raspberrypi.org/imager/imager_latest_amd64.deb
I use MacOS to demonstrate.

Setting Your Linux Account Password: An Important Step.
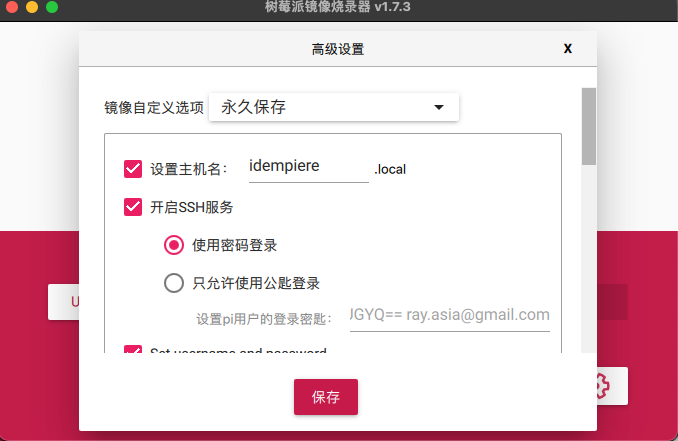
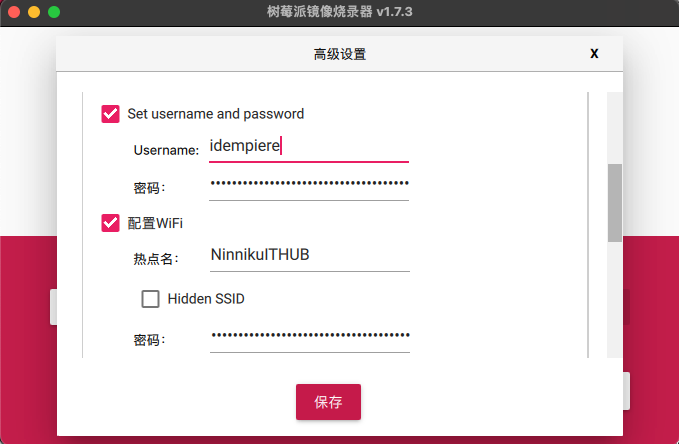
Once it’s set, you can grill it
Connect to Raspberry Pi 4
After the Raspberry Pi has been booted, you can connect to it using Secure Shell (SSH).
If you don’t know the IP address of your Raspberry Pi, you can use a network scanner tool like “Angry IP Scanner” or “Advanced IP Scanner” to scan your network and find the IP address of your Raspberry Pi. Once you have the IP address, you can use an SSH client like PuTTY (Windows OS Only) to connect to your Raspberry Pi. Alternatively, you can connect your Raspberry Pi to a monitor and keyboard and use the command “ifconfig” in the terminal to display its IP address.
For the following procedure, you can refer to another article.
English Version
Before installing WordPress on Raspberry Pi, you may want to know about its advantages and disadvantages. You can refer to the following post.
This guide will teach you how to quickly make an Ubuntu Operation System SD card, boot it on Raspberry Pi 4, and set up the WordPress server.
Preparation
- A microSD card ( 32GB to 128GB)
- A computer with a microSD card drive
- A Raspberry Pi 4 B ( 4G or 8G Ram)
- A USB-C power cable
- A Wi-Fi network or an ethernet cable with an internet connection
Optionally:
- A monitor with an HDMI interface
- An HDMI cable for the Pi 2 & 3 and a micro HDMI cable for the Pi 4
- A USB keyboard
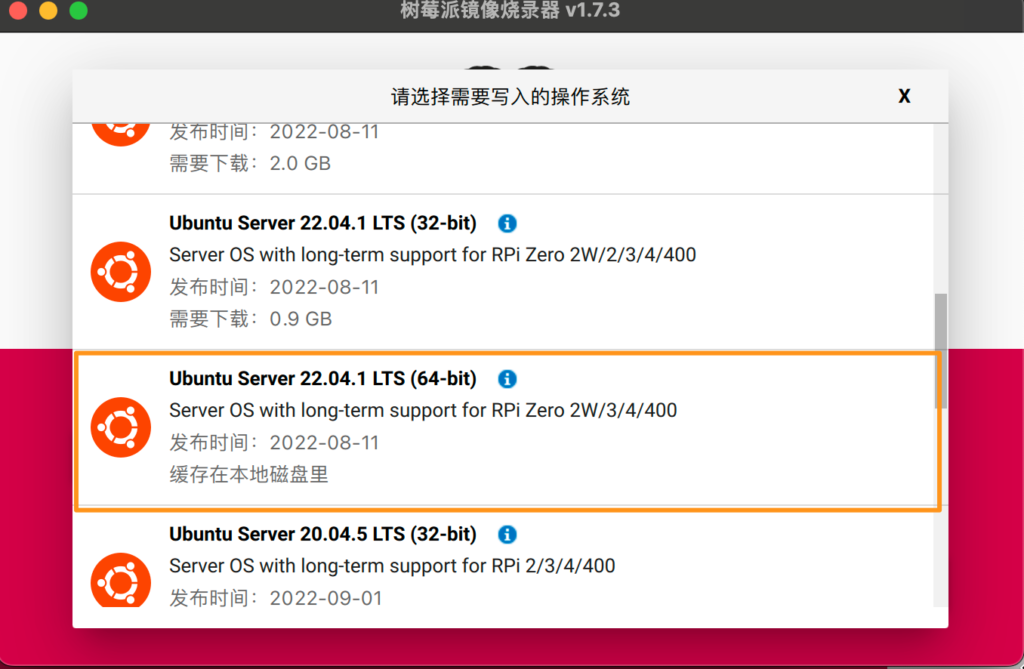
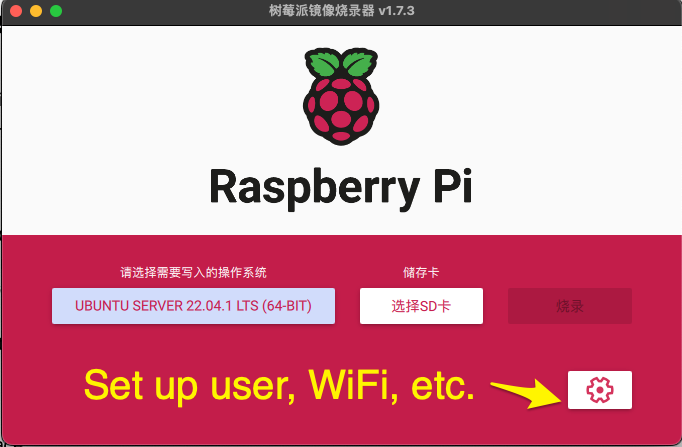
Prepare the SD Card
Download Raspberry Imager from the raspberry pi official website.
Windows:
https://downloads.raspberrypi.org/imager/imager_latest.exe
MacOS:
https://downloads.raspberrypi.org/imager/imager_latest.dmg
Ubuntu:
https://downloads.raspberrypi.org/imager/imager_latest_amd64.deb
I use MacOS to demonstrate.
Setting Your Linux Account Password: An Important Step.
Once it’s set, you can grill it
Connect to Raspberry Pi 4
After the Raspberry Pi has been booted, you can connect to it using Secure Shell (SSH).
If you don’t know the IP address of your Raspberry Pi, you can use a network scanner tool like “Angry IP Scanner” or “Advanced IP Scanner” to scan your network and find the IP address of your Raspberry Pi. Once you have the IP address, you can use an SSH client like PuTTY (Windows OS Only) to connect to your Raspberry Pi. Alternatively, you can connect your Raspberry Pi to a monitor and keyboard and use the command “ifconfig” in the terminal to display its IP address.
For the following procedure, you can refer to another article.
日本語版
Raspberry PiにWordPressをインストールする前に、そのメリットとデメリットについて知っておくとよいでしょう。以下の記事を参照してください。
このガイドでは、Ubuntu OSのSDカードを素早く作成し、Raspberry Pi 4で起動し、WordPressサーバーをセットアップする方法を説明します。
準備するもの
- microSDカード(32GBから128GB)
- microSDカードドライブ付きのコンピュータ
- Raspberry Pi 4 B(4GBまたは8GB RAM)
- USB-C電源ケーブル
- Wi-Fiネットワークまたはインターネット接続のあるイーサネットケーブル
オプション:
- HDMIインターフェース付きモニター
- Pi 2 & 3用HDMIケーブル、Pi 4用micro HDMIケーブル
- USBキーボード
SDカードの準備
Raspberry Pi公式ウェブサイトからRaspberry Imagerをダウンロードします。
Windows:
https://downloads.raspberrypi.org/imager/imager_latest.exe
MacOS:
https://downloads.raspberrypi.org/imager/imager_latest.dmg
Ubuntu:
https://downloads.raspberrypi.org/imager/imager_latest_amd64.deb
ここではMacOSで実演します。
Linuxアカウントのパスワード設定:重要なステップ
設定が完了したら、書き込みを開始できます
Raspberry Pi 4に接続する
Raspberry Piが起動したら、Secure Shell(SSH)を使用して接続できます。
Raspberry PiのIPアドレスが分からない場合は、「Angry IP Scanner」や「Advanced IP Scanner」などのネットワークスキャナーツールを使用して、ネットワークをスキャンしRaspberry PiのIPアドレスを見つけることができます。IPアドレスが分かったら、PuTTY(Windows OSのみ)などのSSHクライアントを使用してRaspberry Piに接続できます。または、Raspberry Piにモニターとキーボードを接続し、ターミナルで「ifconfig」コマンドを使用してIPアドレスを表示することもできます。