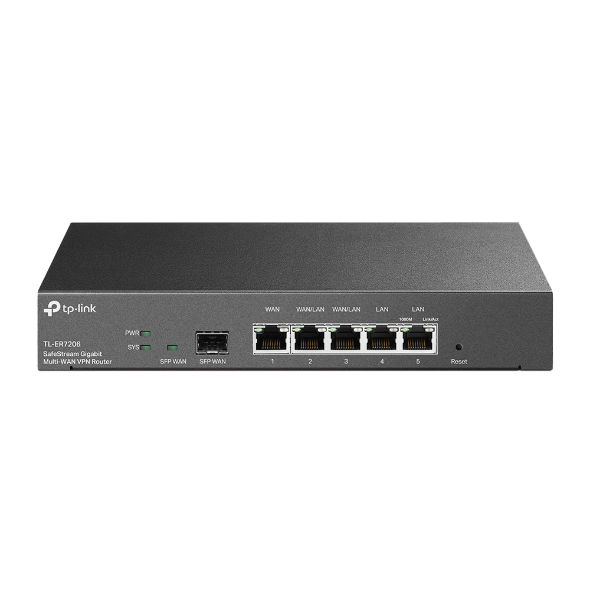
In today’s dynamic work environment, enabling secure and seamless remote access to the company’s local area network (LAN) is crucial. The TP-Link ER7206 Omada Gigabit VPN Router offers robust features, including centralized management and VPN server capabilities. This blog post will guide you through the process of configuring the ER7206 to authenticate VPN users against your organization’s LDAP server, providing a secure and manageable remote access solution.
Prerequisites:
- A TP-Link ER7206 router.
- A properly configured and accessible LDAP server within your organization’s network.
- Basic understanding of networking concepts, WAN/LAN configurations, VPNs, and LDAP.
- Administrative access to the Omada Controller and your LDAP server.
Let’s dive into the configuration steps:
Section 1: WAN Setup
First, ensure your TP-Link ER7206 router has a working internet connection. This involves configuring the Wide Area Network (WAN) interface.
- Navigate to WAN: In the left-hand menu, click on “WAN.”
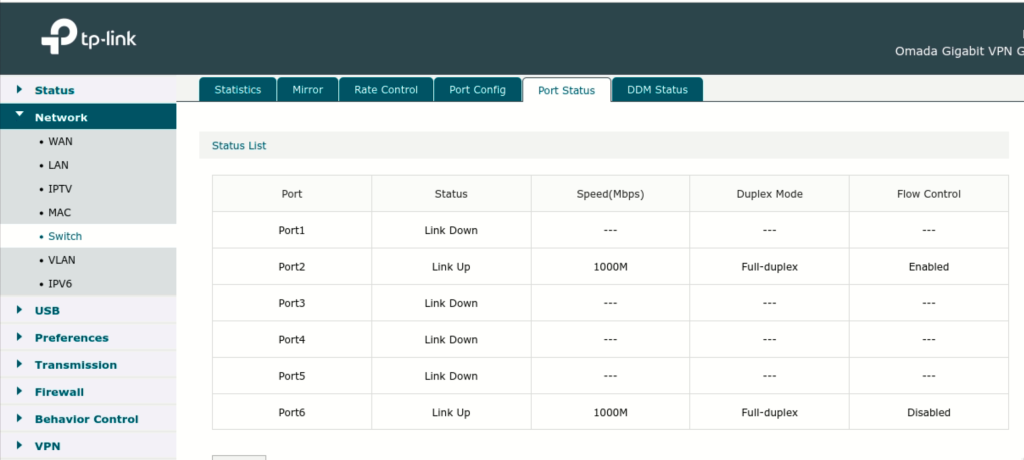
- WAN Mode Selection: Choose your WAN mode type. For example, I am using the default mode. (Image-2)
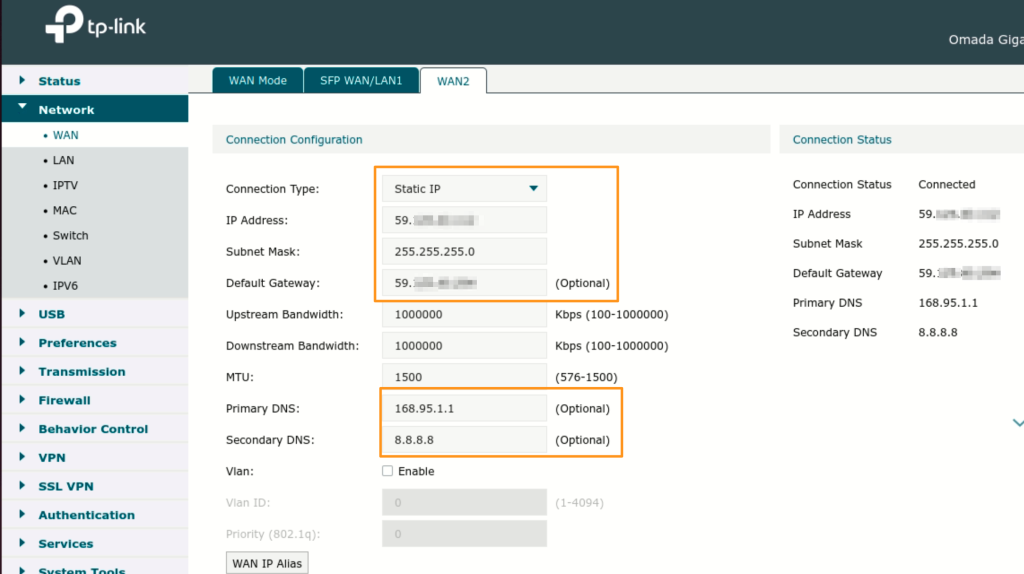
- Configure Your WAN Port: Look for the “WAN” settings. In my case, it’s “WAN2.” Fill in the setting information.
- Choose Connection Type: Select the appropriate connection type based on your internet service provider (e.g., DHCP, Static IP, PPPoE). (Image-3)
- Enter Connection Details: Provide the necessary information such as IP address, subnet mask, gateway, DNS servers (for Static IP), or username and password (for PPPoE).
- Apply Changes: Once you have entered the correct details, click “Apply” or “Save” to save the WAN configuration. Ensure the router can successfully connect to the internet.

Section 2: Set VPN IP Pool
Next, we need to define a range of IP addresses that will be assigned to clients connecting via VPN. This IP pool should be different from your local network’s IP address range to avoid conflicts.
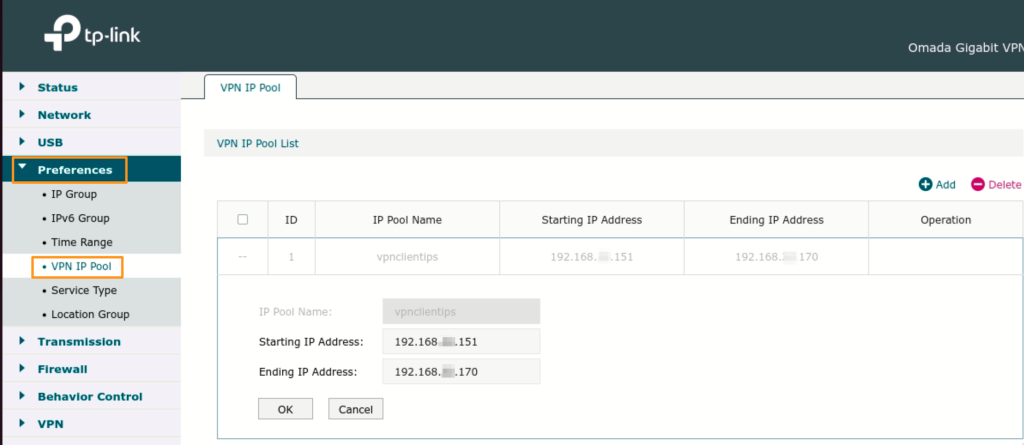
- Navigate to Preferences Settings: In Menu, go to “Preferences” and then find the “VPN IP Poll” section. (Image-4)
- Create a New IP Pool: Click “Create New IP Pool” or “Add.”
- Define the IP Pool:
- Name: Give the IP pool a descriptive name (e.g., “vpnclientips”).
- Start IP Address: Enter the first IP address in the range you want to allocate for VPN clients.
- End IP Address: Enter the last IP address in the range.
- Apply Changes: Click “Apply” or “Save” to save the IP address pool configuration.
Section 3: Setup LDAP Configuration
Now, we’ll configure the ER7206 to communicate with your LDAP server for user authentication.
- Navigate to Authentication: In the Omada Controller’s “Settings,” look for the “Authentication” section.
- Go to LDAP: Select the “LDAP” option.
- Configure LDAP Server: Click “Create New LDAP Server” or “Add.”
- Enter LDAP Server Details:
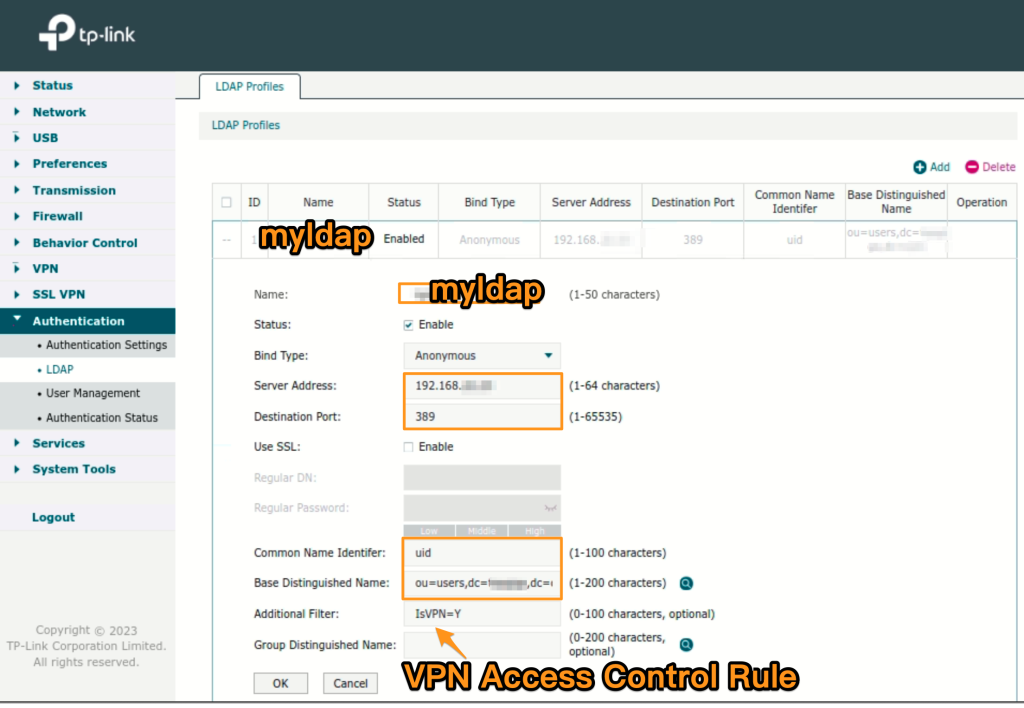
- Name: Give this LDAP configuration a name (e.g., “myldap”).
- Server Address: Enter the IP address or fully qualified domain name (FQDN) of your LDAP server.
- Destination Port: Specify the LDAP server’s port (usually 389 for standard LDAP or 636 for LDAPS).
- Base DN: Enter the base distinguished name (DN) of your LDAP directory tree where user accounts are located (e.g.,
dc=example,dc=com). - Bind Type: Choose the appropriate bind type. In this case, we are using Anonymous bind for the additional file rule.
- Common Name Identifer: Specify the LDAP attribute that corresponds to the user’s login name (e.g.,
uid,sAMAccountName). - Base Distinguished Name: Enter the Organizational Unit (OU) where your company’s users are located. For example:
ou=users,dc=yourcompany,dc=com. - Additional Filter (Optional): Use this if you only want certain users in your company to be able to use the VPN service.
- Apply Changes: Click “Apply” or “Save” to save the LDAP configuration.
Section 4: Setup L2TP VPN Server
With the WAN configured, the IP pool defined, and LDAP integration set up, we can now configure the L2TP VPN server.
- Navigate to VPN Settings:
- Go to L2TP :
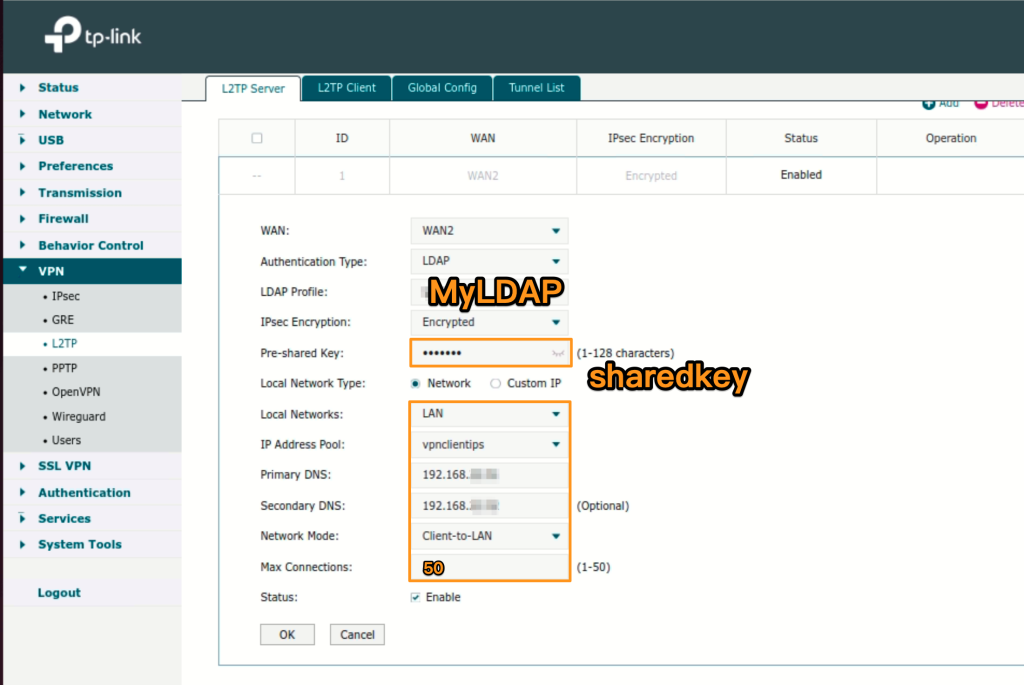
- Enable L2TP Server: Ensure the “Enable L2TP Server” option is checked.
- Select WAN Interface: Choose the WAN interface that external clients will connect to.
- Authentication Method: Select “LDAP”
- IP Address Pool: Select the VPN IP pool you created in Section 2 (e.g., “vpnclintips”).
- Maximum Connections: Set the maximum number of concurrent VPN connections allowed.
- Secret (Pre-shared Key): Enter a strong and unique pre-shared key that VPN clients will need to configure on their devices. Keep this key confidential.
- Apply Changes: Click “Apply” or “Save” to save the L2TP VPN server configuration.
Section 5: Setup Computer Client (MacOS)
Finally, let’s configure a macOS client to connect to the L2TP VPN server.
- Open System Settings: On your macOS computer, go to “System Settings” (or “System Preferences” in older versions).
- Navigate to Network: Click on “Network.”
- Add VPN Connection: Click the “+” button at the bottom of the network interface list and select “Add VPN Configuration…”.
- Choose VPN Type: From the “VPN Type” dropdown menu, select “L2TP over IPsec.”
- Service Name: Enter a descriptive name for your VPN connection (e.g., “Company VPN”). Click “Create.”
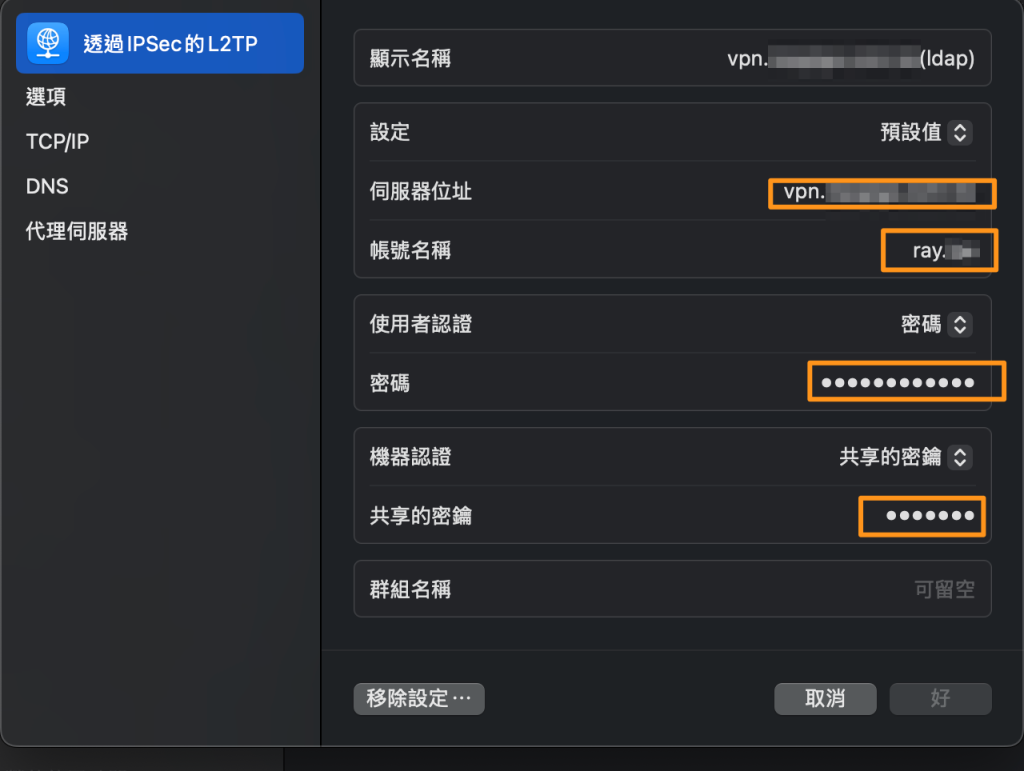
- Configure VPN Settings:
- Server Address: Enter the public IP address or domain name of your TP-Link ER7206 router’s WAN interface.
- Account Name: Enter your LDAP username (the attribute you configured in the LDAP settings, e.g., your employee ID or login).
- Password: Enter your LDAP password.
- Authentication Settings: Click on the “Authentication Settings…” button.
- Shared Secret: Enter the pre-shared key you configured on the ER7206 router in Section 4. Click “OK.”
- Advanced Settings (Optional): Click on the “Advanced…” button.
- Send all traffic over VPN connection: Check this box if you want all internet traffic to be routed through the VPN connection.
- DNS: You can optionally configure specific DNS servers to be used when connected to the VPN.
- Apply and Connect: Click “Apply” to save the VPN configuration. Then, click “Connect” to establish the VPN connection. You may be prompted for your username and password again.
Conclusion:
By following these steps, you have successfully configured your TP-Link ER7206 router for centralized management and enabled secure remote access to your company’s LAN using L2TP VPN with LDAP authentication. This setup provides a manageable and secure way for your employees to work remotely, leveraging your existing LDAP infrastructure for user authentication. Remember to regularly review your VPN and security configurations to ensure ongoing security and optimal performance.
English Version
In today’s dynamic work environment, enabling secure and seamless remote access to the company’s local area network (LAN) is crucial. The TP-Link ER7206 Omada Gigabit VPN Router offers robust features, including centralized management and VPN server capabilities. This blog post will guide you through the process of configuring the ER7206 to authenticate VPN users against your organization’s LDAP server, providing a secure and manageable remote access solution.
Prerequisites:
- A TP-Link ER7206 router.
- A properly configured and accessible LDAP server within your organization’s network.
- Basic understanding of networking concepts, WAN/LAN configurations, VPNs, and LDAP.
- Administrative access to the Omada Controller and your LDAP server.
Let’s dive into the configuration steps:
Section 1: WAN Setup
First, ensure your TP-Link ER7206 router has a working internet connection. This involves configuring the Wide Area Network (WAN) interface.
- Navigate to WAN: In the left-hand menu, click on “WAN.”
- WAN Mode Selection: Choose your WAN mode type. For example, I am using the default mode. (Image-2)
- Configure Your WAN Port: Look for the “WAN” settings. In my case, it’s “WAN2.” Fill in the setting information.
- Choose Connection Type: Select the appropriate connection type based on your internet service provider (e.g., DHCP, Static IP, PPPoE). (Image-3)
- Enter Connection Details: Provide the necessary information such as IP address, subnet mask, gateway, DNS servers (for Static IP), or username and password (for PPPoE).
- Apply Changes: Once you have entered the correct details, click “Apply” or “Save” to save the WAN configuration. Ensure the router can successfully connect to the internet.
Section 2: Set VPN IP Pool
Next, we need to define a range of IP addresses that will be assigned to clients connecting via VPN. This IP pool should be different from your local network’s IP address range to avoid conflicts.
- Navigate to Preferences Settings: In Menu, go to “Preferences” and then find the “VPN IP Poll” section. (Image-4)
- Create a New IP Pool: Click “Create New IP Pool” or “Add.”
- Define the IP Pool:
- Name: Give the IP pool a descriptive name (e.g., “vpnclientips”).
- Start IP Address: Enter the first IP address in the range you want to allocate for VPN clients.
- End IP Address: Enter the last IP address in the range.
- Apply Changes: Click “Apply” or “Save” to save the IP address pool configuration.
Section 3: Setup LDAP Configuration
Now, we’ll configure the ER7206 to communicate with your LDAP server for user authentication.
- Navigate to Authentication: In the Omada Controller’s “Settings,” look for the “Authentication” section.
- Go to LDAP: Select the “LDAP” option.
- Configure LDAP Server: Click “Create New LDAP Server” or “Add.”
- Enter LDAP Server Details:
- Name: Give this LDAP configuration a name (e.g., “myldap”).
- Server Address: Enter the IP address or fully qualified domain name (FQDN) of your LDAP server.
- Destination Port: Specify the LDAP server’s port (usually 389 for standard LDAP or 636 for LDAPS).
- Base DN: Enter the base distinguished name (DN) of your LDAP directory tree where user accounts are located (e.g.,
dc=example,dc=com). - Bind Type: Choose the appropriate bind type. In this case, we are using Anonymous bind for the additional file rule.
- Common Name Identifer: Specify the LDAP attribute that corresponds to the user’s login name (e.g.,
uid,sAMAccountName). - Base Distinguished Name: Enter the Organizational Unit (OU) where your company’s users are located. For example:
ou=users,dc=yourcompany,dc=com. - Additional Filter (Optional): Use this if you only want certain users in your company to be able to use the VPN service.
- Apply Changes: Click “Apply” or “Save” to save the LDAP configuration.
Section 4: Setup L2TP VPN Server
With the WAN configured, the IP pool defined, and LDAP integration set up, we can now configure the L2TP VPN server.
- Navigate to VPN Settings:
- Go to L2TP :
- Enable L2TP Server: Ensure the “Enable L2TP Server” option is checked.
- Select WAN Interface: Choose the WAN interface that external clients will connect to.
- Authentication Method: Select “LDAP”
- IP Address Pool: Select the VPN IP pool you created in Section 2 (e.g., “vpnclintips”).
- Maximum Connections: Set the maximum number of concurrent VPN connections allowed.
- Secret (Pre-shared Key): Enter a strong and unique pre-shared key that VPN clients will need to configure on their devices. Keep this key confidential.
- Apply Changes: Click “Apply” or “Save” to save the L2TP VPN server configuration.
Section 5: Setup Computer Client (MacOS)
Finally, let’s configure a macOS client to connect to the L2TP VPN server.
- Open System Settings: On your macOS computer, go to “System Settings” (or “System Preferences” in older versions).
- Navigate to Network: Click on “Network.”
- Add VPN Connection: Click the “+” button at the bottom of the network interface list and select “Add VPN Configuration…”.
- Choose VPN Type: From the “VPN Type” dropdown menu, select “L2TP over IPsec.”
- Service Name: Enter a descriptive name for your VPN connection (e.g., “Company VPN”). Click “Create.”
- Configure VPN Settings:
- Server Address: Enter the public IP address or domain name of your TP-Link ER7206 router’s WAN interface.
- Account Name: Enter your LDAP username (the attribute you configured in the LDAP settings, e.g., your employee ID or login).
- Password: Enter your LDAP password.
- Authentication Settings: Click on the “Authentication Settings…” button.
- Shared Secret: Enter the pre-shared key you configured on the ER7206 router in Section 4. Click “OK.”
- Advanced Settings (Optional): Click on the “Advanced…” button.
- Send all traffic over VPN connection: Check this box if you want all internet traffic to be routed through the VPN connection.
- DNS: You can optionally configure specific DNS servers to be used when connected to the VPN.
- Apply and Connect: Click “Apply” to save the VPN configuration. Then, click “Connect” to establish the VPN connection. You may be prompted for your username and password again.
Conclusion:
By following these steps, you have successfully configured your TP-Link ER7206 router for centralized management and enabled secure remote access to your company’s LAN using L2TP VPN with LDAP authentication. This setup provides a manageable and secure way for your employees to work remotely, leveraging your existing LDAP infrastructure for user authentication. Remember to regularly review your VPN and security configurations to ensure ongoing security and optimal performance.
日本語版
今日のダイナミックな業務環境において、企業のローカルエリアネットワーク(LAN)への安全でシームレスなリモートアクセスを実現することは非常に重要です。TP-Link ER7206 Omada ギガビットVPNルーターは、集中管理やVPNサーバー機能を含む堅牢な機能を提供します。このブログ記事では、ER7206を設定して、組織のLDAPサーバーに対してVPNユーザーを認証し、安全で管理しやすいリモートアクセスソリューションを提供するプロセスをご案内します。
前提条件:
- TP-Link ER7206ルーター。
- 組織のネットワーク内で適切に設定され、アクセス可能なLDAPサーバー。
- ネットワークの概念、WAN/LAN設定、VPN、LDAPに関する基本的な理解。
- Omada ControllerおよびLDAPサーバーへの管理者アクセス。
それでは設定手順に入りましょう:
セクション1:WANセットアップ
まず、TP-Link ER7206ルーターがインターネット接続を確立していることを確認します。これには、ワイドエリアネットワーク(WAN)インターフェースの設定が含まれます。
- WANに移動: 左側のメニューで「WAN」をクリックします。
- WANモードの選択: WANモードタイプを選択します。例として、デフォルトモードを使用しています。(Image-2)
- WANポートの設定: 「WAN」設定を探します。私の場合は「WAN2」です。設定情報を入力します。
- 接続タイプの選択: インターネットサービスプロバイダーに基づいて適切な接続タイプを選択します(例:DHCP、固定IP、PPPoE)。(Image-3)
- 接続詳細の入力: IPアドレス、サブネットマスク、ゲートウェイ、DNSサーバー(固定IPの場合)、またはユーザー名とパスワード(PPPoEの場合)などの必要な情報を入力します。
- 変更の適用: 正しい詳細を入力したら、「Apply」または「Save」をクリックしてWAN設定を保存します。ルーターがインターネットに正常に接続できることを確認します。
セクション2:VPN IPプールの設定
次に、VPN経由で接続するクライアントに割り当てられるIPアドレスの範囲を定義する必要があります。このIPプールは、競合を避けるために、ローカルネットワークのIPアドレス範囲とは異なるものにする必要があります。
- 環境設定に移動: メニューで「Preferences」に移動し、「VPN IP Poll」セクションを見つけます。(Image-4)
- 新しいIPプールの作成: 「Create New IP Pool」または「Add」をクリックします。
- IPプールの定義:
- 名前: IPプールにわかりやすい名前を付けます(例:「vpnclientips」)。
- 開始IPアドレス: VPNクライアントに割り当てたい範囲の最初のIPアドレスを入力します。
- 終了IPアドレス: 範囲の最後のIPアドレスを入力します。
- 変更の適用: 「Apply」または「Save」をクリックしてIPアドレスプールの設定を保存します。
セクション3:LDAP設定のセットアップ
次に、ユーザー認証のためにER7206がLDAPサーバーと通信するように設定します。
- 認証に移動: Omada Controllerの「Settings」で、「Authentication」セクションを探します。
- LDAPに移動: 「LDAP」オプションを選択します。
- LDAPサーバーの設定: 「Create New LDAP Server」または「Add」をクリックします。
- LDAPサーバーの詳細を入力:
- 名前: このLDAP設定に名前を付けます(例:「myldap」)。
- サーバーアドレス: LDAPサーバーのIPアドレスまたは完全修飾ドメイン名(FQDN)を入力します。
- 宛先ポート: LDAPサーバーのポートを指定します(標準LDAPの場合は通常389、LDAPSの場合は636)。
- Base DN: ユーザーアカウントが存在するLDAPディレクトリツリーのベース識別名(DN)を入力します(例:
dc=example,dc=com)。 - バインドタイプ: 適切なバインドタイプを選択します。今回は、追加フィルタールールに匿名バインドを使用しています。
- 共通名識別子: ユーザーのログイン名に対応するLDAP属性を指定します(例:
uid、sAMAccountName)。 - ベース識別名: 会社のユーザーが存在する組織単位(OU)を入力します。例:
ou=users,dc=yourcompany,dc=com。 - 追加フィルター(オプション): 会社内の特定のユーザーのみがVPNサービスを使用できるようにしたい場合に使用します。
- 変更の適用: 「Apply」または「Save」をクリックしてLDAP設定を保存します。
セクション4:L2TP VPNサーバーのセットアップ
WANの設定、IPプールの定義、LDAP統合のセットアップが完了したので、L2TP VPNサーバーを設定できます。
- VPN設定に移動:
- L2TPに移動:
- L2TPサーバーの有効化: 「Enable L2TP Server」オプションがチェックされていることを確認します。
- WANインターフェースの選択: 外部クライアントが接続するWANインターフェースを選択します。
- 認証方法: 「LDAP」を選択します。
- IPアドレスプール: セクション2で作成したVPN IPプールを選択します(例:「vpnclintips」)。
- 最大接続数: 許可される同時VPN接続の最大数を設定します。
- シークレット(事前共有キー): VPNクライアントがデバイスに設定する必要がある、強力でユニークな事前共有キーを入力します。このキーは機密として保管してください。
- 変更の適用: 「Apply」または「Save」をクリックしてL2TP VPNサーバーの設定を保存します。
セクション5:コンピュータークライアントのセットアップ(MacOS)
最後に、L2TP VPNサーバーに接続するためにmacOSクライアントを設定しましょう。
- システム設定を開く: macOSコンピューターで、「システム設定」(古いバージョンでは「システム環境設定」)に移動します。
- ネットワークに移動: 「ネットワーク」をクリックします。
- VPN接続の追加: ネットワークインターフェースリストの下部にある「+」ボタンをクリックし、「VPN構成を追加…」を選択します。
- VPNタイプの選択: 「VPNタイプ」ドロップダウンメニューから、「L2TP over IPsec」を選択します。
- サービス名: VPN接続のわかりやすい名前を入力します(例:「Company VPN」)。「作成」をクリックします。
- VPN設定の構成:
- サーバーアドレス: TP-Link ER7206ルーターのWANインターフェースのパブリックIPアドレスまたはドメイン名を入力します。
- アカウント名: LDAPユーザー名を入力します(LDAP設定で構成した属性、例:社員IDまたはログイン名)。
- パスワード: LDAPパスワードを入力します。
- 認証設定: 「認証設定…」ボタンをクリックします。
- 共有シークレット: セクション4でER7206ルーターに設定した事前共有キーを入力します。「OK」をクリックします。
- 詳細設定(オプション): 「詳細…」ボタンをクリックします。
- すべてのトラフィックをVPN接続経由で送信: すべてのインターネットトラフィックをVPN接続経由でルーティングしたい場合は、このボックスにチェックを入れます。
- DNS: VPN接続時に使用する特定のDNSサーバーをオプションで設定できます。
- 適用して接続: 「適用」をクリックしてVPN設定を保存します。次に、「接続」をクリックしてVPN接続を確立します。ユーザー名とパスワードの再入力を求められる場合があります。
結論:
これらの手順に従うことで、TP-Link ER7206ルーターの集中管理を設定し、LDAP認証によるL2TP VPNを使用して企業のLANへの安全なリモートアクセスを有効にすることに成功しました。このセットアップは、既存のLDAPインフラストラクチャをユーザー認証に活用し、従業員がリモートで安全に業務を行うための管理しやすいソリューションを提供します。セキュリティと最適なパフォーマンスを確保するために、VPNとセキュリティの設定を定期的に見直すことを忘れないでください。