Introduction:
Potentiometers are versatile devices commonly used in electronics to control the voltage or current of a circuit. In this article, we will explore how to use a potentiometer to control the brightness of an LED using pulse width modulation (PWM) on an Arduino board. By the end of this tutorial, you will be able to adjust the brightness of an LED using a simple potentiometer.
Materials:
- Arduino board (UNO or similar)
- Breadboard
- Jumper wires
- Potentiometer (10k ohm)
- LED
- Resistor (220 ohm)
Instructions:
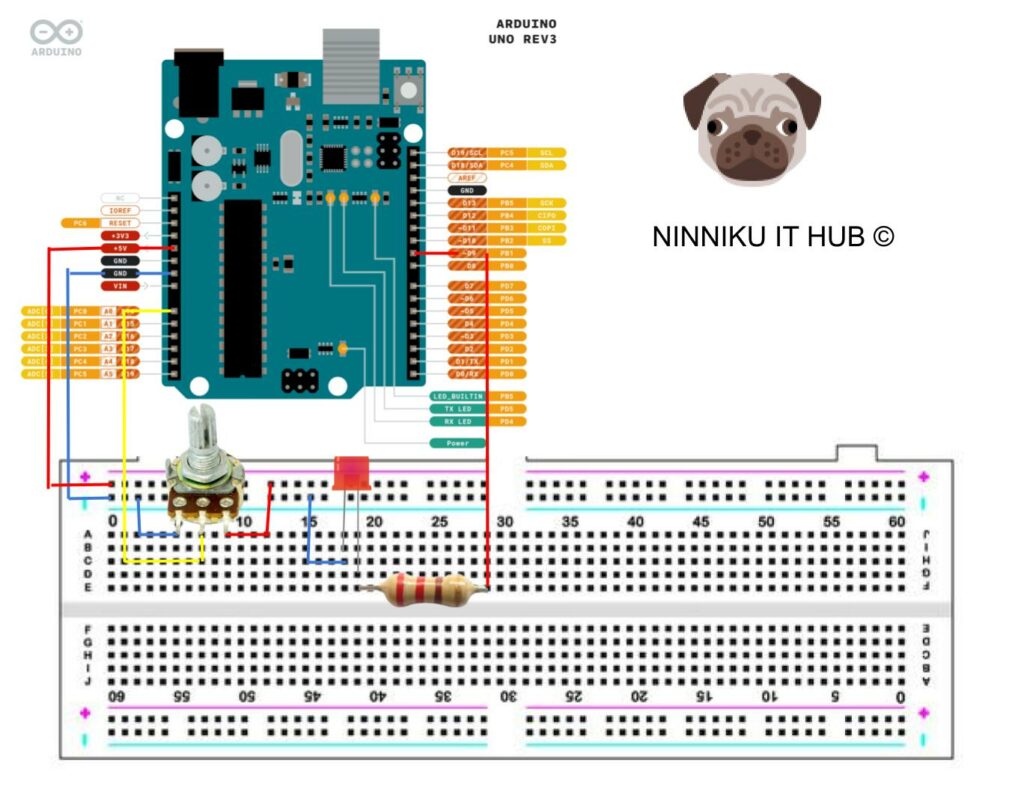
- Connect the potentiometer to the breadboard. The potentiometer should have three pins: the left pin, the right pin, and the middle pin (also called the wiper). Connect the left pin to ground and the right pin to 5V on the Arduino board. Connect the middle pin to analog input pin A0 on the Arduino board.
- Connect the LED to the breadboard. Connect the longer leg of the LED to a digital pin on the Arduino board (we will use pin 9 in this tutorial) through a 220 ohm resistor. Connect the shorter leg of the LED to ground.
- Upload the following code to the Arduino board:
int potPin = A0;     // analog input pin A0
int ledPin = 9;      // digital output pin 9
int brightness = 0;  // current brightness of the LED
int time = 0;
void setup() {
  Serial.begin(9600);
  pinMode(ledPin, OUTPUT);  // set the LED pin as output
}

void loop() {
  int potVal = analogRead(potPin);            // read the potentiometer value (0-1023)
  brightness = map(potVal, 0, 1023, 0, 255);  // map the potentiometer value to 0-255
  analogWrite(ledPin, brightness);            // set the LED brightness using PWM
  //
  if (time > 1000) {
    Serial.print("Potentiometer value: ");  // Print potentiometer value
    Serial.print(potVal);
    Serial.print("\tLED brightness: ");  // Print LED brightness value
    Serial.println(brightness);
    time = 0;
  }
   time++;
}- Open the Serial Monitor in the Arduino IDE and set the baud rate to 9600. You should see the current potentiometer value and LED brightness printed on the Serial Monitor.
- Turn the potentiometer knob and observe the changes in LED brightness. The brightness should increase as you turn the knob to the right, and decrease as you turn it to the left.
Conclusion:
Controlling the brightness of an LED using a potentiometer and PWM on an Arduino board is a simple yet effective way to introduce yourself to the world of electronics. By understanding the principles behind PWM and how to use a potentiometer, you can create more advanced projects that involve controlling the speed of motors, the volume of speakers, and more.
English Version
Introduction:
Potentiometers are versatile devices commonly used in electronics to control the voltage or current of a circuit. In this article, we will explore how to use a potentiometer to control the brightness of an LED using pulse width modulation (PWM) on an Arduino board. By the end of this tutorial, you will be able to adjust the brightness of an LED using a simple potentiometer.
Materials:
- Arduino board (UNO or similar)
- Breadboard
- Jumper wires
- Potentiometer (10k ohm)
- LED
- Resistor (220 ohm)
Instructions:
- Connect the potentiometer to the breadboard. The potentiometer should have three pins: the left pin, the right pin, and the middle pin (also called the wiper). Connect the left pin to ground and the right pin to 5V on the Arduino board. Connect the middle pin to analog input pin A0 on the Arduino board.
- Connect the LED to the breadboard. Connect the longer leg of the LED to a digital pin on the Arduino board (we will use pin 9 in this tutorial) through a 220 ohm resistor. Connect the shorter leg of the LED to ground.
- Upload the following code to the Arduino board:
int potPin = A0;     // analog input pin A0
int ledPin = 9;      // digital output pin 9
int brightness = 0;  // current brightness of the LED
int time = 0;
void setup() {
  Serial.begin(9600);
  pinMode(ledPin, OUTPUT);  // set the LED pin as output
}

void loop() {
  int potVal = analogRead(potPin);            // read the potentiometer value (0-1023)
  brightness = map(potVal, 0, 1023, 0, 255);  // map the potentiometer value to 0-255
  analogWrite(ledPin, brightness);            // set the LED brightness using PWM
  //
  if (time > 1000) {
    Serial.print("Potentiometer value: ");  // Print potentiometer value
    Serial.print(potVal);
    Serial.print("\tLED brightness: ");  // Print LED brightness value
    Serial.println(brightness);
    time = 0;
  }
   time++;
}- Open the Serial Monitor in the Arduino IDE and set the baud rate to 9600. You should see the current potentiometer value and LED brightness printed on the Serial Monitor.
- Turn the potentiometer knob and observe the changes in LED brightness. The brightness should increase as you turn the knob to the right, and decrease as you turn it to the left.
Conclusion:
Controlling the brightness of an LED using a potentiometer and PWM on an Arduino board is a simple yet effective way to introduce yourself to the world of electronics. By understanding the principles behind PWM and how to use a potentiometer, you can create more advanced projects that involve controlling the speed of motors, the volume of speakers, and more.
日本語版
はじめに:
ポテンショメータは、回路の電圧や電流を制御するために電子工学で広く使用される汎用性の高いデバイスです。この記事では、Arduinoボード上でパルス幅変調(PWM)を使用してポテンショメータでLEDの明るさを制御する方法を解説します。このチュートリアルを終える頃には、シンプルなポテンショメータを使ってLEDの明るさを調整できるようになります。
必要な材料:
- Arduinoボード(UNOまたは同等品)
- ブレッドボード
- ジャンパーワイヤー
- ポテンショメータ(10kオーム)
- LED
- 抵抗(220オーム)
手順:
- ポテンショメータをブレッドボードに接続します。ポテンショメータには3つのピンがあります:左ピン、右ピン、中央ピン(ワイパーとも呼ばれます)。左ピンをグランドに、右ピンをArduinoボードの5Vに接続します。中央ピンをArduinoボードのアナログ入力ピンA0に接続します。
- LEDをブレッドボードに接続します。LEDの長い脚を220オームの抵抗を通してArduinoボードのデジタルピン(このチュートリアルではピン9を使用)に接続します。LEDの短い脚をグランドに接続します。
- 以下のコードをArduinoボードにアップロードします:
int potPin = A0;     // analog input pin A0
int ledPin = 9;      // digital output pin 9
int brightness = 0;  // current brightness of the LED
int time = 0;
void setup() {
  Serial.begin(9600);
  pinMode(ledPin, OUTPUT);  // set the LED pin as output
}

void loop() {
  int potVal = analogRead(potPin);            // read the potentiometer value (0-1023)
  brightness = map(potVal, 0, 1023, 0, 255);  // map the potentiometer value to 0-255
  analogWrite(ledPin, brightness);            // set the LED brightness using PWM
  //
  if (time > 1000) {
    Serial.print("Potentiometer value: ");  // Print potentiometer value
    Serial.print(potVal);
    Serial.print("\tLED brightness: ");  // Print LED brightness value
    Serial.println(brightness);
    time = 0;
  }
   time++;
}- Arduino IDEでシリアルモニターを開き、ボーレートを9600に設定します。シリアルモニターに現在のポテンショメータの値とLEDの明るさが表示されるはずです。
- ポテンショメータのノブを回して、LEDの明るさの変化を観察します。ノブを右に回すと明るさが増し、左に回すと暗くなるはずです。
まとめ:
Arduinoボード上でポテンショメータとPWMを使用してLEDの明るさを制御することは、電子工学の世界に入門するためのシンプルかつ効果的な方法です。PWMの原理とポテンショメータの使い方を理解することで、モーターの速度制御、スピーカーの音量制御など、より高度なプロジェクトを作成できるようになります。