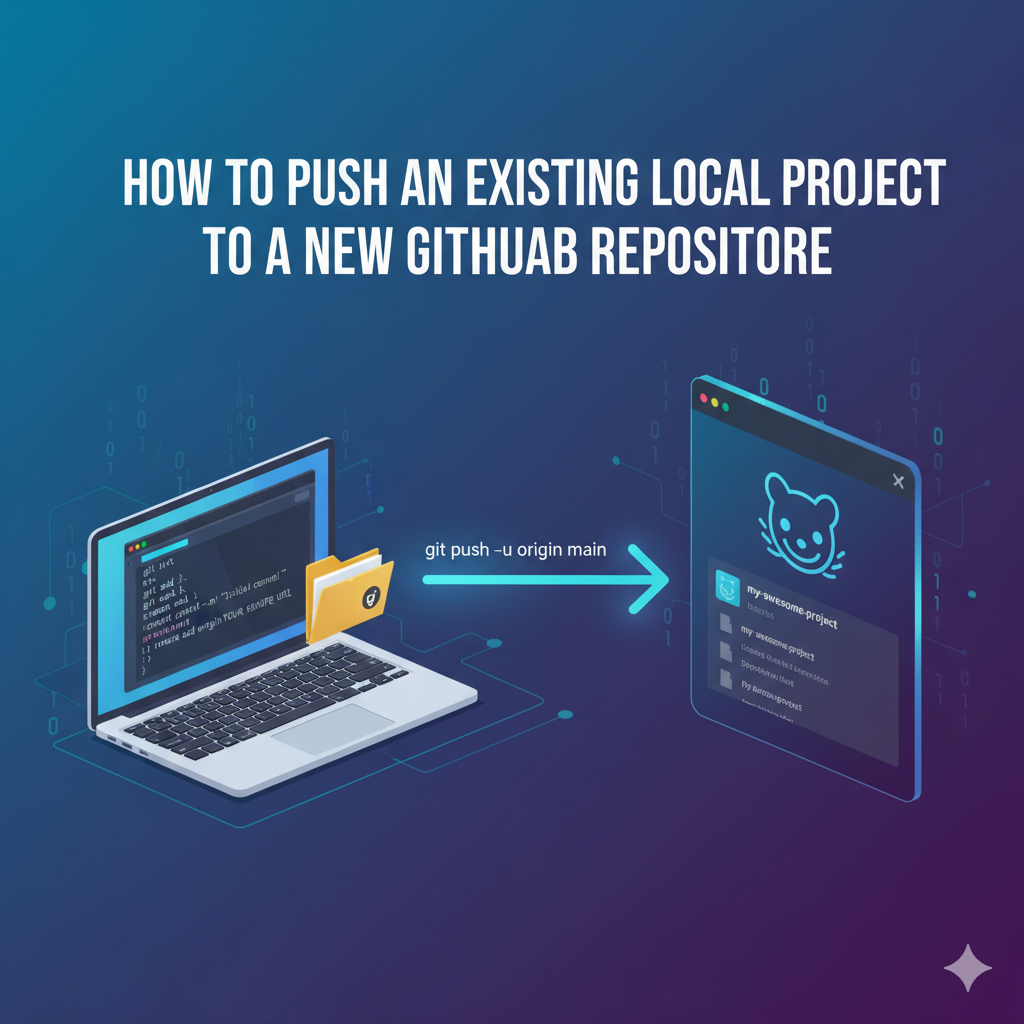
So you’ve been coding locally, and now you’re ready to share your project with the world (or just back it up securely) by pushing it to GitHub. This is a fundamental task for any developer using Git.
This guide walks you through the steps to connect your local Git repository to a brand-new repository on GitHub using the command line.
Prerequisites
Before you begin, make sure you have:
- A GitHub account
- Git installed on your local machine
- Your project folder ready, which is already a local Git repository (i.e., you have already run
git initand made at least onegit commit).
Step 1: Create a New GitHub Repository
First, you need a destination for your code on GitHub.
- Go to GitHub and log in.
- In the upper-right corner, click the $+$ sign and select New repository.
- Fill in the details:
- Repository name: Give it the same name as your local project folder for consistency.
- Description (Optional): Add a brief description.
- Visibility: Choose Public or Private.
- Crucially: Do not check the box to initialize the repository with a README,
.gitignore, or license. Since you are pushing an existing project, an empty repository works best.
- Click Create repository.
After creation, GitHub will display a “Quick Setup” page with instructions. Look for the section titled “…or push an existing repository from the command line.”
Step 2: Connect Your Local Repository to GitHub
Now, open your terminal (Git Bash, Command Prompt, or your preferred terminal) and navigate to the root directory of your local project.
Bash
cd /path/to/your/local/project
2.1 Add the Remote Origin
The git remote add origin command tells your local Git where the remote (GitHub) version of your project lives.
Copy the HTTPS or SSH URL from the GitHub Quick Setup page (e.g., https://github.com/USERNAME/REPO-NAME.git) and run:
Bash
git remote add origin YOUR_REMOTE_URL
ex:
git remote add origin https://github.com/USERNAME/REPO-NAME.git
Replace YOUR_REMOTE_URL with the URL you copied.
You can verify that the remote was added correctly:
Bash
git remote -v
This should output the fetch and push URLs for your new origin.
2.2 Rename the Main Branch (If Necessary)
Older local repositories might still use master as the default branch name. GitHub’s current standard is main. It’s good practice to align them.
To rename your local branch to main:
Bash
git branch -M main
Step 3: Push Your Code to GitHub
This is the final step where you upload your local commits to the remote repository.
Use the git push command with the following flags:
Bash
git push -u origin main
git push: Executes the push operation.-u: Sets the upstream branch. This means Git remembers that your localmainbranch should track the remoteorigin/mainbranch, allowing you to use simplergit pushandgit pullcommands later.origin main: Specifies that you are pushing the localmainbranch to the remote namedorigin.
You may be prompted to enter your GitHub username and Personal Access Token (PAT).
Success!
Once the push is complete, refresh the GitHub repository page in your browser. You will see all your project files and commit history!
You have successfully uploaded your existing local Git project and created a new GitHub repository! Happy coding!
English Version
So you’ve been coding locally, and now you’re ready to share your project with the world (or just back it up securely) by pushing it to GitHub. This is a fundamental task for any developer using Git.
This guide walks you through the steps to connect your local Git repository to a brand-new repository on GitHub using the command line.
Prerequisites
Before you begin, make sure you have:
- A GitHub account
- Git installed on your local machine
- Your project folder ready, which is already a local Git repository (i.e., you have already run
git initand made at least onegit commit).
Step 1: Create a New GitHub Repository
First, you need a destination for your code on GitHub.
- Go to GitHub and log in.
- In the upper-right corner, click the $+$ sign and select New repository.
- Fill in the details:
- Repository name: Give it the same name as your local project folder for consistency.
- Description (Optional): Add a brief description.
- Visibility: Choose Public or Private.
- Crucially: Do not check the box to initialize the repository with a README,
.gitignore, or license. Since you are pushing an existing project, an empty repository works best.
- Click Create repository.
After creation, GitHub will display a “Quick Setup” page with instructions. Look for the section titled “…or push an existing repository from the command line.”
Step 2: Connect Your Local Repository to GitHub
Now, open your terminal (Git Bash, Command Prompt, or your preferred terminal) and navigate to the root directory of your local project.
Bash
cd /path/to/your/local/project
2.1 Add the Remote Origin
The git remote add origin command tells your local Git where the remote (GitHub) version of your project lives.
Copy the HTTPS or SSH URL from the GitHub Quick Setup page (e.g., https://github.com/USERNAME/REPO-NAME.git) and run:
Bash
git remote add origin YOUR_REMOTE_URL
ex:
git remote add origin https://github.com/USERNAME/REPO-NAME.git
Replace YOUR_REMOTE_URL with the URL you copied.
You can verify that the remote was added correctly:
Bash
git remote -v
This should output the fetch and push URLs for your new origin.
2.2 Rename the Main Branch (If Necessary)
Older local repositories might still use master as the default branch name. GitHub’s current standard is main. It’s good practice to align them.
To rename your local branch to main:
Bash
git branch -M main
Step 3: Push Your Code to GitHub
This is the final step where you upload your local commits to the remote repository.
Use the git push command with the following flags:
Bash
git push -u origin main
git push: Executes the push operation.-u: Sets the upstream branch. This means Git remembers that your localmainbranch should track the remoteorigin/mainbranch, allowing you to use simplergit pushandgit pullcommands later.origin main: Specifies that you are pushing the localmainbranch to the remote namedorigin.
You may be prompted to enter your GitHub username and Personal Access Token (PAT).
Success!
Once the push is complete, refresh the GitHub repository page in your browser. You will see all your project files and commit history!
You have successfully uploaded your existing local Git project and created a new GitHub repository! Happy coding!
日本語版
ローカルでコーディングしてきて、いよいよプロジェクトをGitHubにプッシュして世界と共有(または安全にバックアップ)する準備ができました。これはGitを使用するすべての開発者にとって基本的なタスクです。
このガイドでは、コマンドラインを使用してローカルのGitリポジトリをGitHub上の新しいリポジトリに接続する手順を解説します。
前提条件
開始する前に、以下を確認してください:
- GitHubアカウント
- ローカルマシンにGitがインストールされていること
- プロジェクトフォルダが準備されており、すでにローカルGitリポジトリであること(つまり、
git initを実行し、少なくとも1回のgit commitを行っていること)。
ステップ1:新しいGitHubリポジトリの作成
まず、GitHub上にコードの保存先が必要です。
- GitHubにアクセスしてログインします。
- 右上の$+$マークをクリックし、New repositoryを選択します。
- 詳細を入力します:
- Repository name: 一貫性のため、ローカルのプロジェクトフォルダと同じ名前を付けます。
- Description(オプション): 簡単な説明を追加します。
- Visibility: PublicまたはPrivateを選択します。
- 重要: README、
.gitignore、またはライセンスでリポジトリを初期化するチェックボックスにチェックを入れないでください。既存のプロジェクトをプッシュするため、空のリポジトリが最適です。
- Create repositoryをクリックします。
作成後、GitHubは手順付きの「Quick Setup」ページを表示します。“…or push an existing repository from the command line.”というセクションを探してください。
ステップ2:ローカルリポジトリをGitHubに接続
ターミナル(Git Bash、コマンドプロンプト、またはお好みのターミナル)を開き、ローカルプロジェクトのルートディレクトリに移動します。
Bash
cd /path/to/your/local/project
2.1 リモートoriginの追加
git remote add originコマンドは、プロジェクトのリモート(GitHub)バージョンの場所をローカルGitに伝えます。
GitHubのQuick SetupページからHTTPSまたはSSH URLをコピーし(例:https://github.com/USERNAME/REPO-NAME.git)、実行します:
Bash
git remote add origin YOUR_REMOTE_URL
ex:
git remote add origin https://github.com/USERNAME/REPO-NAME.git
YOUR_REMOTE_URLをコピーしたURLに置き換えてください。
リモートが正しく追加されたことを確認できます:
Bash
git remote -v
新しいoriginのfetchとpushのURLが出力されるはずです。
2.2 メインブランチの名前変更(必要な場合)
古いローカルリポジトリでは、デフォルトのブランチ名としてmasterを使用している場合があります。GitHubの現在の標準はmainです。これらを統一することが良い習慣です。
ローカルブランチをmainに変更するには:
Bash
git branch -M main
ステップ3:コードをGitHubにプッシュ
これがローカルコミットをリモートリポジトリにアップロードする最終ステップです。
以下のフラグを使用してgit pushコマンドを実行します:
Bash
git push -u origin main
git push:プッシュ操作を実行します。-u:上流ブランチを設定します。これにより、ローカルのmainブランチがリモートのorigin/mainブランチを追跡することをGitが記憶し、以降はより簡単なgit pushやgit pullコマンドを使用できるようになります。origin main:ローカルのmainブランチをoriginという名前のリモートにプッシュすることを指定します。
GitHubのユーザー名とPersonal Access Token(PAT)の入力を求められる場合があります。
完了!
プッシュが完了したら、ブラウザでGitHubリポジトリページを更新してください。すべてのプロジェクトファイルとコミット履歴が表示されます!
既存のローカルGitプロジェクトのアップロードと新しいGitHubリポジトリの作成に成功しました!Happy coding!