JavaFX is a powerful framework for building Java-based applications with rich user interfaces. When working with JavaFX projects in Eclipse, setting up the environment with Maven can streamline your development process. In this blog post, we will guide you through a quick setup of a JavaFX project using Maven in Eclipse.
Prerequisites
Before you begin, make sure you have the following installed:
- Java Development Kit (JDK) version 17 or higher
- Eclipse IDE
- Maven (Make sure it’s properly installed and added to your system’s PATH)
Steps to Set Up JavaFX Project with Maven in Eclipse
1. Generate a Maven Project with JavaFX Archetype
- Open a terminal or command prompt.
- Navigate to the directory where you want to create your JavaFX project.
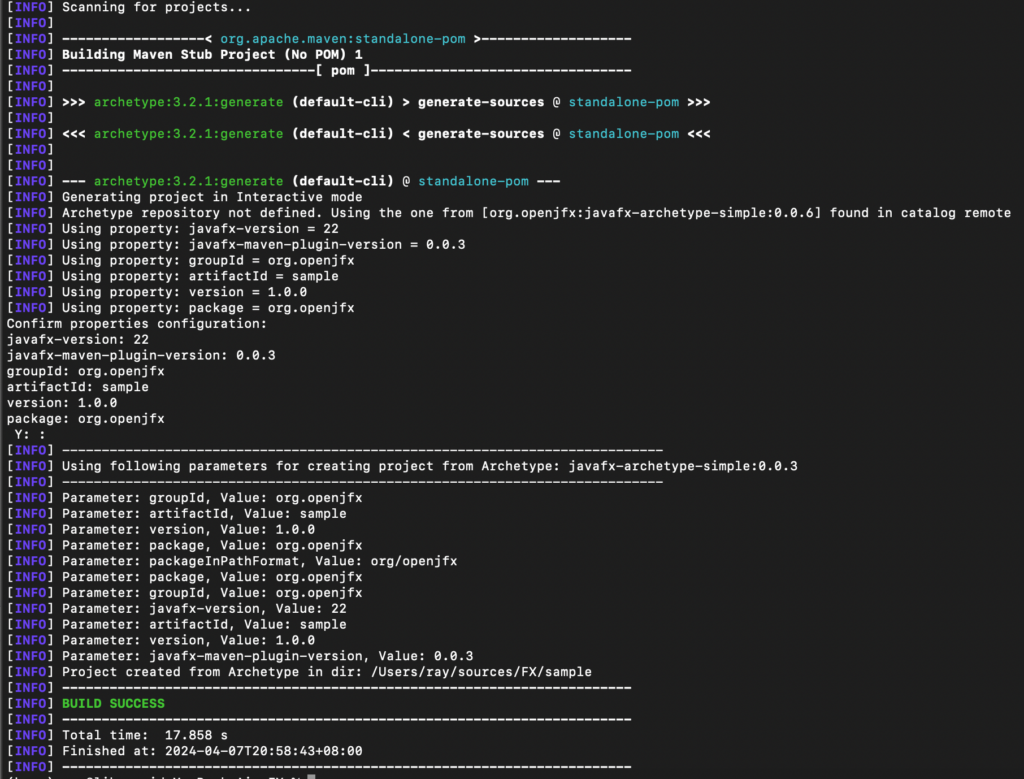
- Run the following Maven command to generate a new project using the JavaFX Maven archetype:
    mvn archetype:generate \
    -DarchetypeGroupId=org.openjfx \
    -DarchetypeArtifactId=javafx-archetype-simple \
    -DarchetypeVersion=0.0.3 \
    -DgroupId=org.openjfx \
    -DartifactId=sample \
    -Dversion=1.0.0 \
    -Djavafx-version=22
Replace the groupId, artifactId, version, javafx-version, maven.compiler.source, and maven.compiler.target with your desired values. This command will generate a new JavaFX Maven project structure based on the specified archetype.
4. Import the Maven Project into Eclipse
- In Eclipse, right-click on the
Package ExplorerorProject Explorer. - Select
Import>Existing Maven Projects. - Browse to the directory where your Maven project was created.
- Select the project and click
Finishto import it into Eclipse.
5. Start Developing with JavaFX in Eclipse
You are now set up to start developing JavaFX applications in Eclipse using Maven. You can begin writing your JavaFX code, add controllers, FXML files, and resources to your project as needed.
Conclusion
Setting up a JavaFX project with Maven in Eclipse is straightforward and helps manage dependencies efficiently. By following the steps outlined in this blog post, you can quickly get started with developing JavaFX applications using Maven as your build tool in Eclipse. If you encounter any issues during the setup process, refer to the official documentation or seek help from the JavaFX community. Happy coding!
English Version
JavaFX is a powerful framework for building Java-based applications with rich user interfaces. When working with JavaFX projects in Eclipse, setting up the environment with Maven can streamline your development process. In this blog post, we will guide you through a quick setup of a JavaFX project using Maven in Eclipse.
Prerequisites
Before you begin, make sure you have the following installed:
- Java Development Kit (JDK) version 17 or higher
- Eclipse IDE
- Maven (Make sure it’s properly installed and added to your system’s PATH)
Steps to Set Up JavaFX Project with Maven in Eclipse
1. Generate a Maven Project with JavaFX Archetype
- Open a terminal or command prompt.
- Navigate to the directory where you want to create your JavaFX project.
- Run the following Maven command to generate a new project using the JavaFX Maven archetype:
    mvn archetype:generate \
    -DarchetypeGroupId=org.openjfx \
    -DarchetypeArtifactId=javafx-archetype-simple \
    -DarchetypeVersion=0.0.3 \
    -DgroupId=org.openjfx \
    -DartifactId=sample \
    -Dversion=1.0.0 \
    -Djavafx-version=22
Replace the groupId, artifactId, version, javafx-version, maven.compiler.source, and maven.compiler.target with your desired values. This command will generate a new JavaFX Maven project structure based on the specified archetype.
4. Import the Maven Project into Eclipse
- In Eclipse, right-click on the
Package ExplorerorProject Explorer. - Select
Import>Existing Maven Projects. - Browse to the directory where your Maven project was created.
- Select the project and click
Finishto import it into Eclipse.
5. Start Developing with JavaFX in Eclipse
You are now set up to start developing JavaFX applications in Eclipse using Maven. You can begin writing your JavaFX code, add controllers, FXML files, and resources to your project as needed.
Conclusion
Setting up a JavaFX project with Maven in Eclipse is straightforward and helps manage dependencies efficiently. By following the steps outlined in this blog post, you can quickly get started with developing JavaFX applications using Maven as your build tool in Eclipse. If you encounter any issues during the setup process, refer to the official documentation or seek help from the JavaFX community. Happy coding!
日本語版
JavaFXは、リッチなユーザーインターフェースを持つJavaベースのアプリケーションを構築するための強力なフレームワークです。EclipseでJavaFXプロジェクトを扱う際、Mavenで環境をセットアップすることで開発プロセスを効率化できます。このブログ記事では、EclipseでMavenを使用したJavaFXプロジェクトのクイックセットアップをご案内します。
前提条件
開始する前に、以下がインストールされていることを確認してください:
- Java Development Kit (JDK) バージョン17以上
- Eclipse IDE
- Maven(適切にインストールされ、システムのPATHに追加されていることを確認してください)
EclipseでMavenを使用したJavaFXプロジェクトのセットアップ手順
1. JavaFXアーキタイプでMavenプロジェクトを生成
- ターミナルまたはコマンドプロンプトを開きます。
- JavaFXプロジェクトを作成したいディレクトリに移動します。
- 以下のMavenコマンドを実行して、JavaFX Mavenアーキタイプを使用して新しいプロジェクトを生成します:
    mvn archetype:generate \
    -DarchetypeGroupId=org.openjfx \
    -DarchetypeArtifactId=javafx-archetype-simple \
    -DarchetypeVersion=0.0.3 \
    -DgroupId=org.openjfx \
    -DartifactId=sample \
    -Dversion=1.0.0 \
    -Djavafx-version=22
groupId、artifactId、version、javafx-version、maven.compiler.source、maven.compiler.targetをお好みの値に置き換えてください。このコマンドは、指定されたアーキタイプに基づいて新しいJavaFX Mavenプロジェクト構造を生成します。
4. MavenプロジェクトをEclipseにインポート
- Eclipseで、
Package ExplorerまたはProject Explorerを右クリックします。 Import>Existing Maven Projectsを選択します。- Mavenプロジェクトが作成されたディレクトリを参照します。
- プロジェクトを選択し、
FinishをクリックしてEclipseにインポートします。
5. EclipseでJavaFX開発を開始
これで、Mavenを使用してEclipseでJavaFXアプリケーションの開発を開始する準備が整いました。必要に応じてJavaFXコードの記述、コントローラー、FXMLファイル、リソースの追加を始めることができます。
まとめ
EclipseでMavenを使用してJavaFXプロジェクトをセットアップすることは簡単で、依存関係を効率的に管理するのに役立ちます。このブログ記事で説明した手順に従うことで、EclipseでMavenをビルドツールとして使用してJavaFXアプリケーションの開発をすぐに始めることができます。セットアップ中に問題が発生した場合は、公式ドキュメントを参照するか、JavaFXコミュニティに助けを求めてください。楽しいコーディングを!