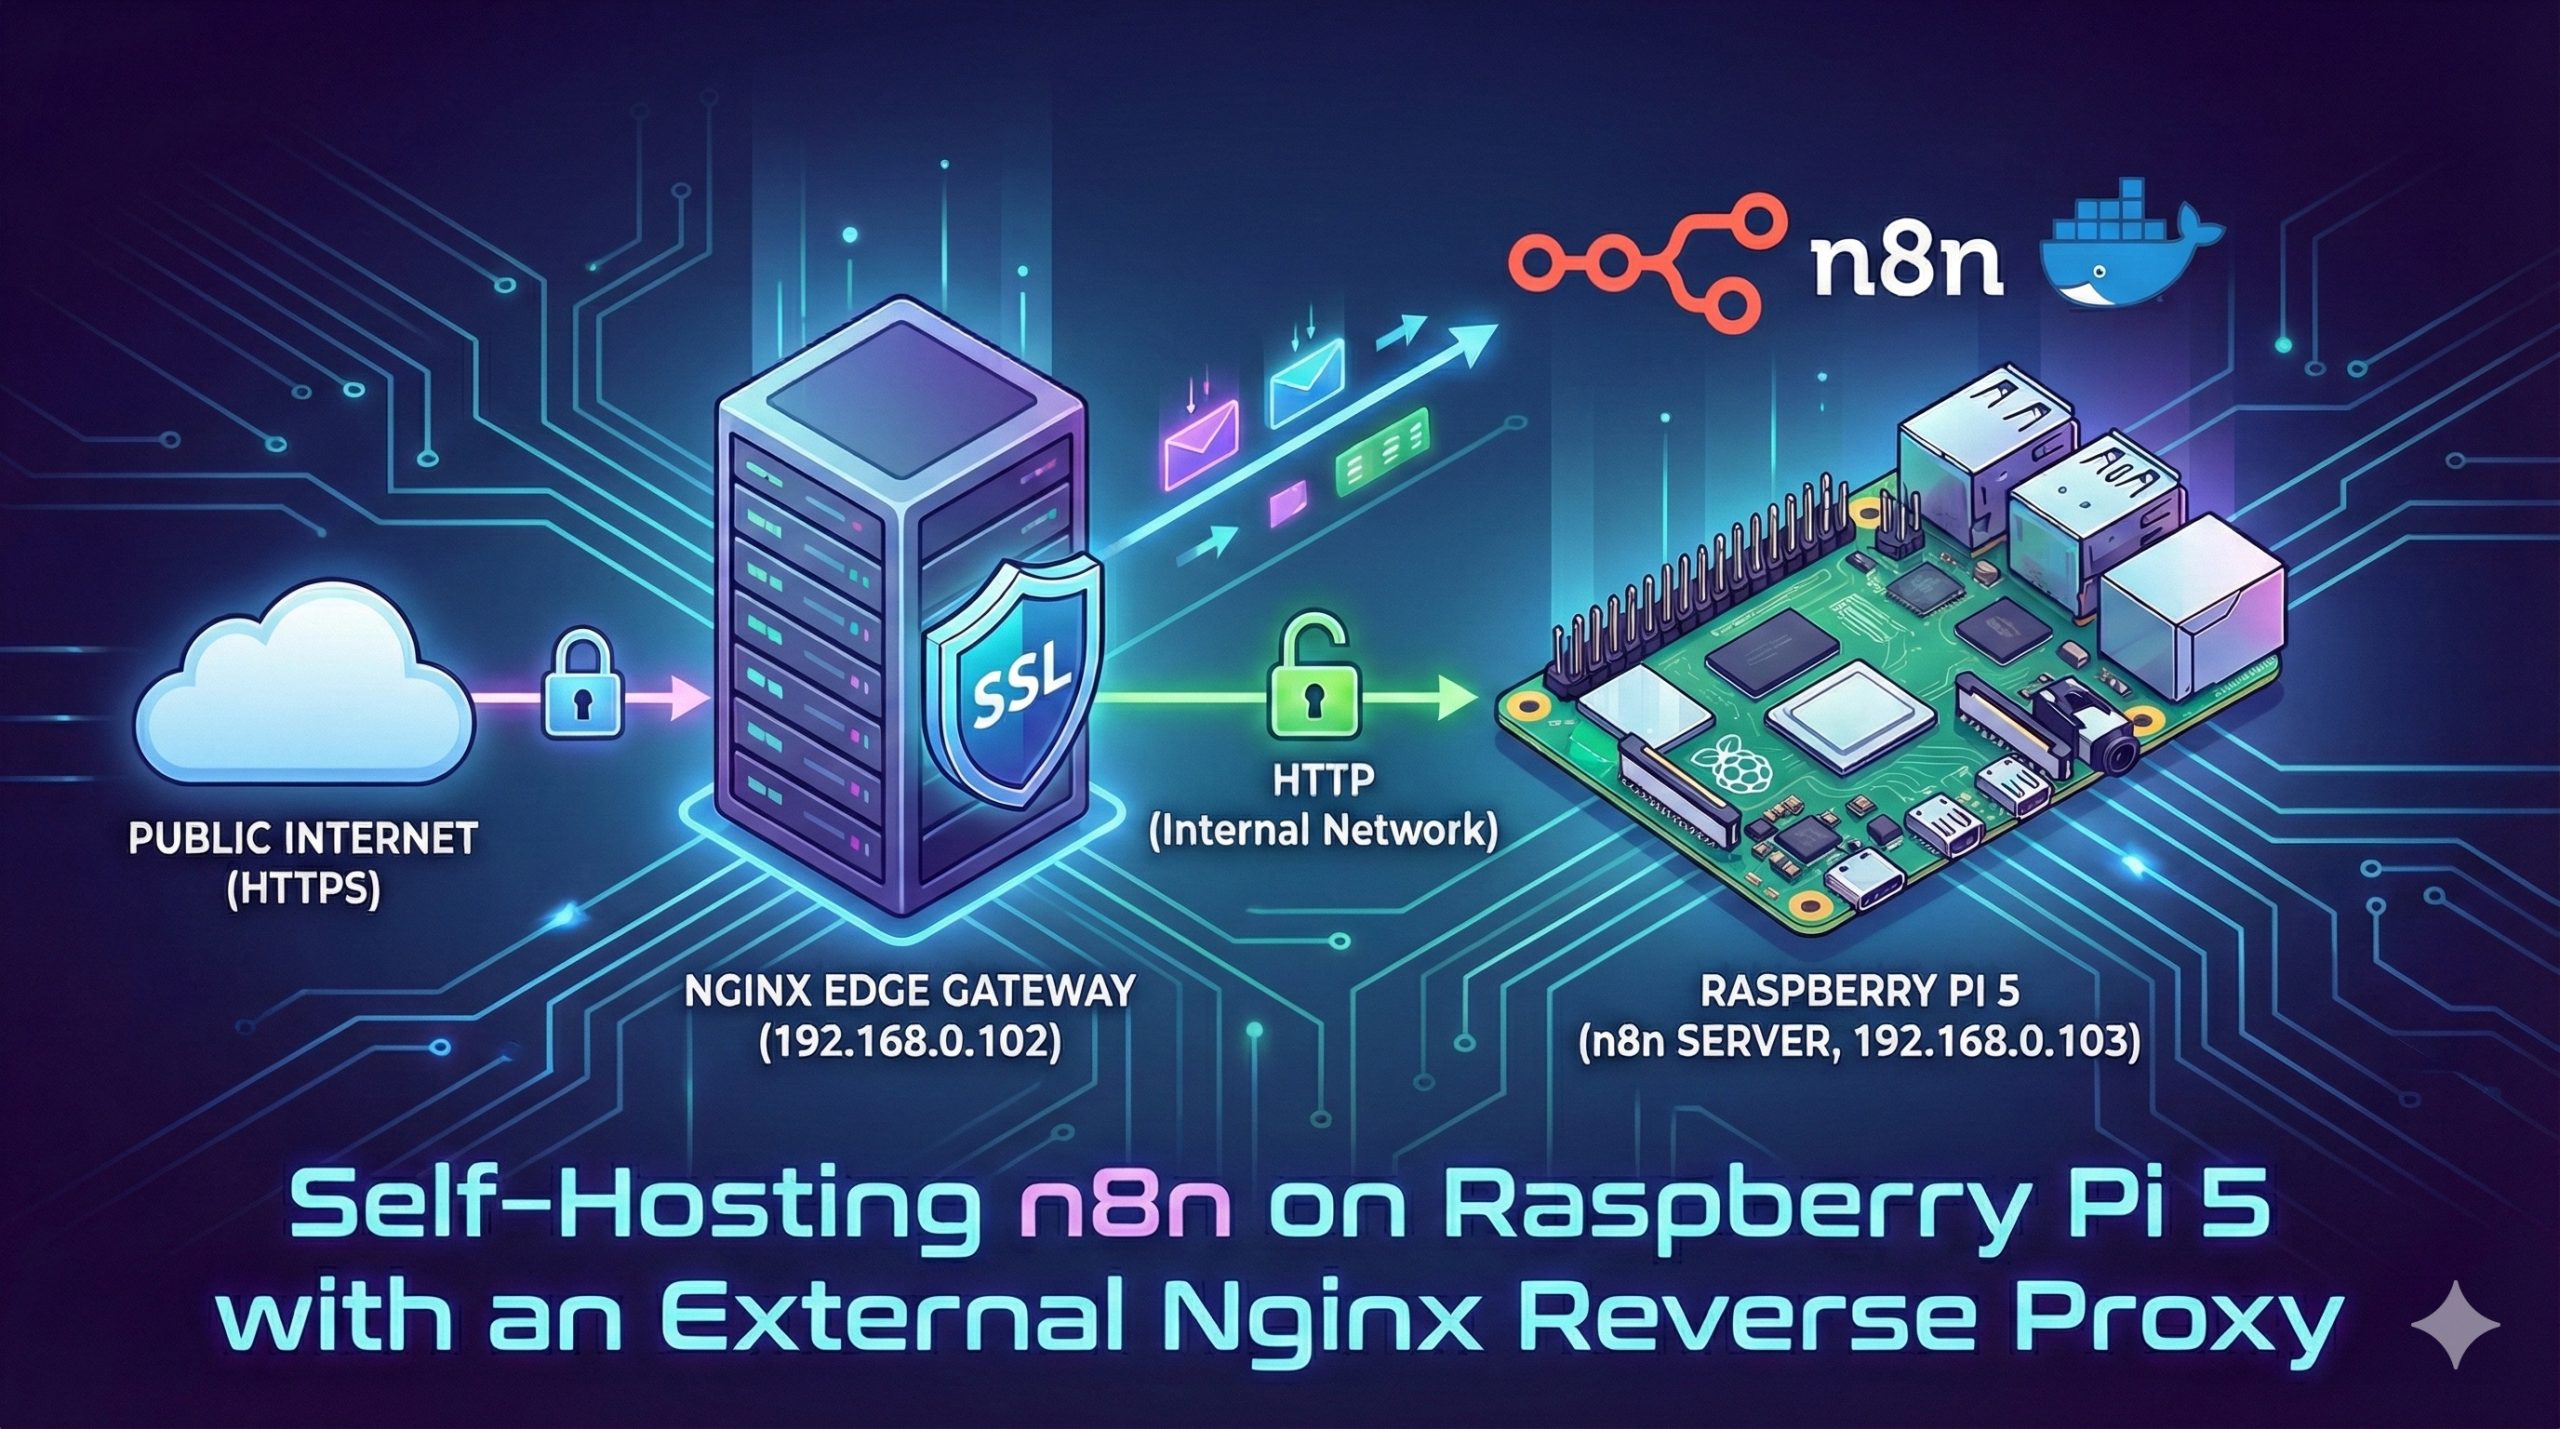
In the world of workflow automation, n8n stands out as a powerful, fair-code tool that gives you full control over your data. Today, we are diving into a professional-grade deployment: running n8n on a Raspberry Pi 5 (Ubuntu) behind a dedicated Nginx Reverse Proxy located on a separate host.
Why This Architecture?
Separating the proxy from the application server is a best practice for security and scalability.
- Host A (192.168.0.102): Acts as the Nginx Edge Gateway, handling SSL/TLS termination.
- Host B (192.168.0.103): The Raspberry Pi 5, dedicated entirely to processing n8n workflows.
Step 1: Deploying n8n on Raspberry Pi 5 (Ubuntu)
We use Docker Compose for deployment because it ensures consistency and makes updates a breeze.
1.1 Install Docker
First, ensure your Ubuntu system on the Pi 5 is up to date:
Bash
sudo apt update && sudo apt upgrade -y
curl -fsSL https://get.docker.com -o get-docker.sh
sudo sh get-docker.sh
sudo usermod -aG docker $USER
1.2 Create the Docker Compose Configuration
Create a directory for n8n and set up the docker-compose.yml:
YAML
services:
  n8n:
    image: n8nio/n8n:latest
    restart: always
    ports:
      - "5678:5678"
    environment:
      - N8N_HOST=n8n.ninniku.tw
      - N8N_PORT=5678
      - N8N_PROTOCOL=https
      - WEBHOOK_URL=https://n8n.your.domain/
      - N8N_SECURE_COOKIE=true
      - NODE_ENV=production
      - GENERIC_TIMEZONE=Asia/Taipei
    volumes:
      - ./n8n_data:/home/node/.n8n
Pro Tip: Even though the internal connection is HTTP, we set
N8N_PROTOCOL=https. This tells n8n to generate valid secure Webhook URLs and allows “Secure Cookies” to work in your browser.
Step 2: Configuring the Nginx Reverse Proxy (192.168.0.102)
Now, we head to our gateway server at .102. The goal is to receive traffic on port 443 (HTTPS) and forward it to the Pi 5 on port 5678.
2.1 The Nginx Configuration
Edit your site configuration file (e.g., /etc/nginx/sites-available/n8n):
Nginx
server {
    listen 443 ssl;
    server_name n8n.your.domain;

    # SSL Configuration (using Let's Encrypt)
    ssl_certificate /etc/letsencrypt/live/n8n.ninniku.tw/fullchain.pem;
    ssl_certificate_key /etc/letsencrypt/live/n8n.ninniku.tw/privkey.pem;

    location / {
        # Forward traffic to the Raspberry Pi 5
        proxy_pass http://192.168.0.103:5678;

        # Essential Headers
        proxy_set_header Host $host;
        proxy_set_header X-Real-IP $remote_addr;
        proxy_set_header X-Forwarded-For $proxy_add_x_forwarded_for;
        proxy_set_header X-Forwarded-Proto $scheme;

        # WebSocket support (Crucial for n8n UI)
        proxy_http_version 1.1;
        proxy_set_header Upgrade $http_upgrade;
        proxy_set_header Connection "upgrade";

        proxy_buffering off;
    }
}
2.2 Why Use SSL Termination?
By terminating SSL at the proxy (102), the Raspberry Pi 5 (103) doesn’t have to waste CPU cycles on encryption/decryption. This “SSL Offloading” allows your Pi to focus its 8GB of RAM and Broadcom BCM2712 processor on running complex automation logic.
Step 3: Understanding the “Internal HTTP” Logic
A common question is: “If my Nginx uses HTTPS, why is my proxy_pass using HTTP?”
This is the standard Secure Gateway Model.
- The Public Internet connects to your Nginx via HTTPS (Encrypted).
- The Internal Network (between .102 and .103) uses HTTP (Fast, No Overhead).
- The
X-Forwarded-Proto $schemeheader tells n8n that the original request was secure, so it remains in “Secure Mode.”
Conclusion
Running n8n on a Raspberry Pi 5 provides a robust, low-power solution for 24/7 automation. By pairing it with a separate Nginx Proxy, you gain a professional networking stack that handles SSL renewal and traffic routing effortlessly.
Ready to automate? Access your new instance at https://n8n.your.domain and start building!
English Version
In the world of workflow automation, n8n stands out as a powerful, fair-code tool that gives you full control over your data. Today, we are diving into a professional-grade deployment: running n8n on a Raspberry Pi 5 (Ubuntu) behind a dedicated Nginx Reverse Proxy located on a separate host.
Why This Architecture?
Separating the proxy from the application server is a best practice for security and scalability.
- Host A (192.168.0.102): Acts as the Nginx Edge Gateway, handling SSL/TLS termination.
- Host B (192.168.0.103): The Raspberry Pi 5, dedicated entirely to processing n8n workflows.
Step 1: Deploying n8n on Raspberry Pi 5 (Ubuntu)
We use Docker Compose for deployment because it ensures consistency and makes updates a breeze.
1.1 Install Docker
First, ensure your Ubuntu system on the Pi 5 is up to date:
Bash
sudo apt update && sudo apt upgrade -y
curl -fsSL https://get.docker.com -o get-docker.sh
sudo sh get-docker.sh
sudo usermod -aG docker $USER
1.2 Create the Docker Compose Configuration
Create a directory for n8n and set up the docker-compose.yml:
YAML
services:
  n8n:
    image: n8nio/n8n:latest
    restart: always
    ports:
      - "5678:5678"
    environment:
      - N8N_HOST=n8n.ninniku.tw
      - N8N_PORT=5678
      - N8N_PROTOCOL=https
      - WEBHOOK_URL=https://n8n.your.domain/
      - N8N_SECURE_COOKIE=true
      - NODE_ENV=production
      - GENERIC_TIMEZONE=Asia/Taipei
    volumes:
      - ./n8n_data:/home/node/.n8n
Pro Tip: Even though the internal connection is HTTP, we set
N8N_PROTOCOL=https. This tells n8n to generate valid secure Webhook URLs and allows “Secure Cookies” to work in your browser.
Step 2: Configuring the Nginx Reverse Proxy (192.168.0.102)
Now, we head to our gateway server at .102. The goal is to receive traffic on port 443 (HTTPS) and forward it to the Pi 5 on port 5678.
2.1 The Nginx Configuration
Edit your site configuration file (e.g., /etc/nginx/sites-available/n8n):
Nginx
server {
    listen 443 ssl;
    server_name n8n.your.domain;

    # SSL Configuration (using Let's Encrypt)
    ssl_certificate /etc/letsencrypt/live/n8n.ninniku.tw/fullchain.pem;
    ssl_certificate_key /etc/letsencrypt/live/n8n.ninniku.tw/privkey.pem;

    location / {
        # Forward traffic to the Raspberry Pi 5
        proxy_pass http://192.168.0.103:5678;

        # Essential Headers
        proxy_set_header Host $host;
        proxy_set_header X-Real-IP $remote_addr;
        proxy_set_header X-Forwarded-For $proxy_add_x_forwarded_for;
        proxy_set_header X-Forwarded-Proto $scheme;

        # WebSocket support (Crucial for n8n UI)
        proxy_http_version 1.1;
        proxy_set_header Upgrade $http_upgrade;
        proxy_set_header Connection "upgrade";

        proxy_buffering off;
    }
}
2.2 Why Use SSL Termination?
By terminating SSL at the proxy (102), the Raspberry Pi 5 (103) doesn’t have to waste CPU cycles on encryption/decryption. This “SSL Offloading” allows your Pi to focus its 8GB of RAM and Broadcom BCM2712 processor on running complex automation logic.
Step 3: Understanding the “Internal HTTP” Logic
A common question is: “If my Nginx uses HTTPS, why is my proxy_pass using HTTP?”
This is the standard Secure Gateway Model.
- The Public Internet connects to your Nginx via HTTPS (Encrypted).
- The Internal Network (between .102 and .103) uses HTTP (Fast, No Overhead).
- The
X-Forwarded-Proto $schemeheader tells n8n that the original request was secure, so it remains in “Secure Mode.”
Conclusion
Running n8n on a Raspberry Pi 5 provides a robust, low-power solution for 24/7 automation. By pairing it with a separate Nginx Proxy, you gain a professional networking stack that handles SSL renewal and traffic routing effortlessly.
Ready to automate? Access your new instance at https://n8n.your.domain and start building!
日本語版
In the world of workflow automation, n8n stands out as a powerful, fair-code tool that gives you full control over your data. Today, we are diving into a professional-grade deployment: running n8n on a Raspberry Pi 5 (Ubuntu) behind a dedicated Nginx Reverse Proxy located on a separate host.
なぜこのアーキテクチャなのか?
Separating the proxy from the application server is a best practice for security and scalability.
- Host A (192.168.0.102): Acts as the Nginx Edge Gateway, handling SSL/TLS termination.
- Host B (192.168.0.103): The Raspberry Pi 5, dedicated entirely to processing n8n workflows.
ステップ1:Raspberry Pi 5(Ubuntu)へのn8nデプロイ
We use Docker Compose for deployment because it ensures consistency and makes updates a breeze.
1.1 Dockerのインストール
First, ensure your Ubuntu system on the Pi 5 is up to date:
Bash
sudo apt update && sudo apt upgrade -y
curl -fsSL https://get.docker.com -o get-docker.sh
sudo sh get-docker.sh
sudo usermod -aG docker $USER
1.2 Docker Compose設定の作成
Create a directory for n8n and set up the docker-compose.yml:
YAML
services:
  n8n:
    image: n8nio/n8n:latest
    restart: always
    ports:
      - "5678:5678"
    environment:
      - N8N_HOST=n8n.ninniku.tw
      - N8N_PORT=5678
      - N8N_PROTOCOL=https
      - WEBHOOK_URL=https://n8n.your.domain/
      - N8N_SECURE_COOKIE=true
      - NODE_ENV=production
      - GENERIC_TIMEZONE=Asia/Taipei
    volumes:
      - ./n8n_data:/home/node/.n8n
Pro Tip: Even though the internal connection is HTTP, we set
N8N_PROTOCOL=https. This tells n8n to generate valid secure Webhook URLs and allows “Secure Cookies” to work in your browser.
ステップ2:Nginxリバースプロキシの設定(192.168.0.102)
Now, we head to our gateway server at .102. The goal is to receive traffic on port 443 (HTTPS) and forward it to the Pi 5 on port 5678.
2.1 Nginx設定
Edit your site configuration file (e.g., /etc/nginx/sites-available/n8n):
Nginx
server {
    listen 443 ssl;
    server_name n8n.your.domain;

    # SSL Configuration (using Let's Encrypt)
    ssl_certificate /etc/letsencrypt/live/n8n.ninniku.tw/fullchain.pem;
    ssl_certificate_key /etc/letsencrypt/live/n8n.ninniku.tw/privkey.pem;

    location / {
        # Raspberry Pi 5にトラフィックを転送
        proxy_pass http://192.168.0.103:5678;

        # 必須ヘッダー
        proxy_set_header Host $host;
        proxy_set_header X-Real-IP $remote_addr;
        proxy_set_header X-Forwarded-For $proxy_add_x_forwarded_for;
        proxy_set_header X-Forwarded-Proto $scheme;

        # WebSocketサポート(n8n UIに不可欠)
        proxy_http_version 1.1;
        proxy_set_header Upgrade $http_upgrade;
        proxy_set_header Connection "upgrade";

        proxy_buffering off;
    }
}
2.2 なぜSSL終端を使用するのか?
By terminating SSL at the proxy (102), the Raspberry Pi 5 (103) doesn’t have to waste CPU cycles on encryption/decryption. This “SSL Offloading” allows your Pi to focus its 8GB of RAM and Broadcom BCM2712 processor on running complex automation logic.
Step 3: Understanding the “Internal HTTP” Logic
A common question is: “If my Nginx uses HTTPS, why is my proxy_pass using HTTP?”
This is the standard Secure Gateway Model.
- The Public Internet connects to your Nginx via HTTPS (Encrypted).
- The Internal Network (between .102 and .103) uses HTTP (Fast, No Overhead).
- The
X-Forwarded-Proto $schemeheader tells n8n that the original request was secure, so it remains in “Secure Mode.”
まとめ
Running n8n on a Raspberry Pi 5 provides a robust, low-power solution for 24/7 automation. By pairing it with a separate Nginx Proxy, you gain a professional networking stack that handles SSL renewal and traffic routing effortlessly.
自動化の準備はできましたか? Access your new instance at https://n8n.your.domain and start building!